Category Archives: Azure

Microsoft Entra Authentication Methods Policy Convergence

“Complexity is the worst enemy of security, and our systems are getting more complex all the time.” – Bruce Schneier (@schneierblog)

Microsoft recently launched “Authentication Methods Policy Convergence” (Public Preview). This is so very exciting because it exponentially reduces the complexity of multifactor authentication. I was part of the private preview program, and I’m very happy to see this feature going public.

In my book, “Securing Microsoft 365 (2nd Edition) (2022)” I write about the imperative of Zero Trust and how to configure multiple factors of authentication to prevent unauthorized access to Microsoft 365. Three years ago, I wrote about the most common MFA myths and misconfigurations that I have seen in customer environments.

As of the fall of 2022, only 25% of all authentications are protected by MFA in Microsoft Entra (Azure Active Directory). So this new simplified experience of configuring MFA is such an incredibly welcome improvement. I believe we will see a significant improvement in MFA adoption over the next two years. The reason it will take some time is because the policy convergence is not yet a forced experience, meaning we will still see customers configuring MFA in multiple portals until they learn about policy convergence. And that is why I am writing this blog article, to get the word out! In January 2024, the legacy multifactor authentication methods portal and SSPR authentication methods will be deprecated. Until then, it is very important to note that the new Authentication methods are evaluated in addition to the legacy MFA and SSPR policies.

One of the biggest improvements that I like about policy convergence is that not only do we get a single place to configure MFA authentication methods, but we also get the ability to target individuals and groups. Previously, if you wanted some users to have the ability to use SMS/TEXT or Voice then you had to enable it for the entire tenant. With policy convergence, we now have the ability to be more selective!

You can migrate your existing policies to the new blade at your own pace. Make sure to follow the latest Microsoft Documentation: “Migrate MFA and SSPR policy settings to the Authentication methods policy for Azure AD” and “ Manage authentication methods for Azure AD

Support for Hardware OATH tokens and Security Questions is coming soon. If you’re using hardware OATH tokens or Security Questions (for SSPR), do not proceed further. 

After you capture available authentication methods from the policies you’re currently using, you can start the migration.Open the Authentication methods policy, click Manage migration, and click Migration in progress. You’ll want to set this option before you make any changes as it will apply your new policy to both sign-in and password reset scenarios.

Screenshot of Migration in progress.

Then, update the new auth methods to match the methods you are currently using, or take this as an opportunity to eliminate the less secure methods. If you do that, just be aware that the user will be forced to register for the more secure methods at their next sign-in (so it would be wise to inform your helpdesk and send an email to your users about what they are going to expect!).

After you update the Authentication methods policy, go through the legacy MFA and SSPR policies and remove each authentication method one-by-one. Test and validate the changes for each method. Then go back to the migration process and mark the migration as complete.

Screenshot of Migration complete.

Be aware that it can take up to 15 minutes before changes are reflected.

After reviewing Jan Bakker’s (@janbakker_) blog post on this same subject, I realized that I could not improve upon it any further, so I just want to direct my readers there because he did such a good job on describing the experience in such great detail: https://janbakker.tech/goodbye-legacy-sspr-and-mfa-settings-hello-authentication-methods-policies/

For example, Jan points out “Ensure you have also enabled the combined registration portal for SSPR and MFA before using the new policies. Microsoft should have already enabled this feature, starting Sept. 30th, 2022, but I still see tenants where this is disabled.”  I too have seen customers with that disabled, so here is the setting that Jan shared on his post:

Azure AD Combined Registration (SSPR + MFA) is rolling out by October 2022

I’m starting to get questions from my customers about what to expect when the Azure AD “Combined Registration” feature is enabled beginning October 2022 and completing January 2023. On March 29th 2022 Microsoft published MC348869 in Message Center.

A bit of background: In April 2020, the combined security information registration experience for registering both multi-factor authentication (MFA) and self-service password reset (SSPR) was made available as an Opt-in feature but otherwise disabled by default.

We quickly encouraged everyone to enable it, for two primary reasons:

1. It simplifies the user experience so they register once instead of twice (when both MFA and SSPR are both used)

2. FIDO2 Security Key registration requires that the combined registration feature is first enabled. this is required if you want to go passwordless, as FIDO2 has use cases that augment WH4B and Authenticator app such as shared workstations or when employees don’t want to use their personal phones for authentication. It also adds URL binding so that users don’t get phished. But this isn’t a blog about FIDO2, I just can’t help use every opportunity to evangelize it – go use it now!

As you can see, even if you don’t use SSPR, it’s still valuable to enable the FIDO2 passwordless experience.

So does this change impact me?

Did you create your tenant after August 15th 2020? Then no, this change won’t impact you because any tenant created after that date already has Combined Registration enabled.

You can go check out to see if you have it enabled by following these instructions:

1. Sign into the Azure portal (portal.azure.com) with a privileged role such as “user administrator” or “global administrator.”
2. Go to Azure Active Directory > User settings > Manage user feature settings.
3. Under “Users can use the combined security information registration experience” – record the setting.

If it is not enabled for all users, then you can select an option to enable it for a pilot group so that you can record the new user experience , and then decide if you want to update your onboarding documentation.
Microsoft provides screen shots of the new experience here:
https://support.microsoft.com/en-us/account-billing/set-up-security-info-from-a-sign-in-page-28180870-c256-4ebf-8bd7-5335571bf9a8

Will there be any user impact?

Another customer recently asked me: “I use ADFS, and I do not have SSPR enabled, will this change impact me?”

Potentially yes. If your tenant currently does not have combined registration enabled, and you do not have SSPR registration currently required, then it is possible that if your SSPR authentication factors are not aligned to your MFA factors then I could imagine a scenario where users would be required to register for the SSPR factors when this change rolls out in October.

So my advice for everyone is to go into your SSPR authentication factors and try to align those with your MFA factors.

What makes this a confusing time (June 2022) is that there are three separate areas to configure factors.

1. Legacy MFA portal

image

2. SSPR Portal
Authentication methods selection in the Azure portal

3. Azure AD Portal – Authentication Methods

image

Eventually I expect these portals to be consolidated into the 3rd portal. Until then, sometimes users are not aware of all these locations to configure the authentication experience.

And recently, one of my customers was confused by the 3rd portal, thinking that “text message” had to do with using SMS as 2FA

image

No – remember this list of options are for passwordless authentication methods. So this text message option is for using your phone number instead of username, then you type in the code on your phone instead of a password (useful for retail environments where there is high employee turnover). Learn more about SMS-based authentication as an alternative to usernames/passwords in the Microsoft documentation here. Just because it is there, does *not* mean you should turn it on! Remember, SMS based authentication is weak! See Alex Weinert’s article “It’s Time to Hang Up on Phone Transports for Authentication.

Pre-registering MFA in M365

This article describes how to make the user onboarding experience into MFA as smooth as possible by pre-registering MFA methods.

Disclaimer: This article only applies to organizations that have decided to use Phone Number for verification. This is not recommended but in some organizations, they are unable to avoid this for a variety of reasons. If you want to learn why phone number verification is weak, check out the Microsoft Article: https://techcommunity.microsoft.com/t5/azure-active-directory-identity/it-s-time-to-hang-up-on-phone-transports-for-authentication/ba-p/1751752

The most ideal scenario would be to deploy Passwordless MFA, such as Windows Hello for Business, Authenticator App, FIDO2 Keys, or Certificate (Preview). You might issue a Temporary Access Pass to allow users to register passwordless methods without knowing the password to the account.

For more information on planning a passwordless deployment, click here: https://docs.microsoft.com/en-us/azure/active-directory/authentication/howto-authentication-passwordless-deployment

Ever wonder what is required to pre-register a user for Phone or Email?

The “Authentication Methods” page displayed in Portal.Azure.com > Azure Active Directory > Users, allows you to pre-define the phone number that would be used for MFA.

image

If you use Always ON MFA, then you can set the user to Enforced. This can be automated with a GUI or PowerShell, or the preferred method would be to use a Conditional Access Policy (if you have Azure AD P1 or EMS E3 or M365 E3).

image

Their very first sign-in experience would be:

image

Otherwise, if you only populate the Mobile Phone field (such as in on-premises Active Directory, and then it synchronizes to Azure AD) then the user’s first sign-in experience will be to verify that the number shown is correct.

image

image

To populate the mobile phone using PowerShell, you can use PowerShell as described here: https://docs.microsoft.com/en-us/azure/active-directory/authentication/howto-sspr-authenticationdata

But if you want to populate the Authentication Phone Number (so that the user can skip the registration page) then the PowerShell gets a little bit more involved.

Method 1 – Using PowerShell version 1 as described here: bulk Pre-registration for Azure MFA for more Seamless Single Sign on and smooth for MFA roll out – Microsoft Tech Community

Method 2 – Using MS Graph as described here: Pre-configure Authentication Methods for end users in Azure AD – Identity Man (identity-man.eu)

At this point I would strongly encourage you to enable number matching notifications and then enable the registration campaign.

Note: After September 30th 2022, the Combined Registration feature will be enabled in all tenants worldwide. This means that if you are using Self Service Password Reset, then the registration experience for users will be combined.
Therefore, instead of waiting until September, I would enable that feature now so that you can update your end-user facing documentation and user communications once rather than twice.
Learn more about Combined Registration here: Combined registration for SSPR and Azure AD Multi-Factor Authentication – Azure Active Directory | Microsoft Docs

Security Concerns with Windows 365–aka Cloud PC

Cloud PC (sold as the Windows 365 Product SKU) is the latest Virtual Desktop service hosted by Microsoft in Azure. This post (Part 1) documents some of the security concerns that Infosec Twitter has identified. Part 2 will explore ways to harden CloudPC/Windows 365.

Cloud PC (Announced 7/14/2021 and Generally Available 8/2/2021)

Azure Virtual Desktop (Announced 6/7/2021) 

Windows Virtual Desktop (9/30/2019)

Azure RemoteApp (Retired on 8/31/2017)

Rand Morimoto wrote a nice write-up on Cloud PC (here), and the differences between it and Azure Virtual Desktop (here). Indeed, many have written articles on it, but the reason for this blog post is to examine the security and respond to some of the harsh criticism on Twitter (the InfoSec community on Twitter is probably the best ‘accountability’ buffer to keep Microsoft in check).

Most of what I have written about securing AVD/WVD (Part 1) and (Part 2) applies equally to Cloud PC. But what I love most about the business edition of Cloud PC is it eliminated all the overhead associated with spinning up the AVD/WVD environment (see Part 1 above to appreciate that effort). The Enterprise Edition requires some additional work but not as much as AVD/WVD, as explained in this Mechanics video here. There are already troubleshooting articles on the Hybrid Azure AD requirements here.

When I created my first Cloud PC, the provisioning process failed. I found out that there were issues with provisioning as described in the forums here. Turns out there were multiple issues and so I have published a separate blog post ‘Troubleshooting Windows 365 business’ here].

As an end user, you access your Cloud PC from: https://windows365.microsoft.com/

Also, it’s worth noting that on August 15th 2021, Microsoft is making Cloud PC available for end users to purchase on their own credit cards. IT Departments can disable this with PowerShell.

Install-module MSCommerce

Connect-MSCommerce

W365 Enterprise – update-MSCommerceProductPolicy -PolicyId AllowSelfServicePurchase -ProductId CFQ7TTC0HHS9 -Enabled $false

W365 Business/w Hybrid Benefits – update-MSCommerceProductPolicy -PolicyId AllowSelfServicePurchase -ProductId CFQ7TTC0J203 -Enabled $false

W365 Business – update-MSCommerceProductPolicy -PolicyId AllowSelfServicePurchase -ProductId CFQ7TTC0HX99 -Enabled $false”

Learn More: Use AllowSelfServicePurchase for the MSCommerce PowerShell module | Microsoft Docs

So why has Twitter been so unforgiving?

1. InfoSec Twitter does not like the default configuration of Local Administrator rights being given to the Cloud PC user. They claim this is not “secure by default.” It’s hard to argue with them on this point.
(1) Benjamin Delpy on Twitter: “Windows 365 is expensive and without basic security Did #mimikatz dumped my Azure *cleartext* password here? Or my Primary Refresh Token? It’s funny how you don’t apply best practices you recommend to the customer to avoid securing by default > https://t.co/Wzb5GAfWfd https://t.co/cMDq1a4l5e” / Twitter
It does appear Microsoft is exploring solving this according to this thread here:
Windows 365 Business Cloud PC Local Admin – Microsoft Tech Community

2. Mimikatz has been updated to dump Windows 365 credentials

(1) Benjamin Delpy on Twitter: “After a little bug report from @LawrenceAbrams, I just pushed a #mimikatz fix to dump even more #Windows365 credentials privilege::debug ts::logonpasswords > https://t.co/HjfZej6tqD” / Twitter

and

(1) Benjamin Delpy on Twitter: “Would you like to try to dump your #Windows365 Azure passwords in the Web Interface too? A new #mimikatz release is here to test! (Remote Desktop client still work, of course!) > https://t.co/Wzb5GAfWfd cc: @awakecoding @RyMangan https://t.co/hdRvVT9BtG” / Twitter

3. Lack of SecureBoot, UEFI, Credential Guard, etc
(1) Benjamin Delpy on Twitter: “Figure 1. VM with hardware enforced security, vTPM, SecureBoot, UEFI, Credential Guard, etc. Figure 2. #Windows365 without basic hardware security, no security feature, BIOS Guess the one running on an old ESXi in basement vs the new 365 revolution from Microsoft in #Azure ? https://t.co/PUGtqO0g3s” / Twitter

Switch your Public DNS zone to Azure DNS

Recently we experienced an issue with Cloudflare DNS. I opened a support ticket but they were unable to explain why some locations around the world were unable to resolve our DNS MX records.

image

This was causing non-deliverable email problems so we decided to switch to Azure DNS.

Step 1 – Export the DNS Zone from Cloudflare (Advanced –> Export)

image

Step 2 – Create the DNS Zone in Azure

I prefer using the Web Interface (here)

Step 3 – Import the zone file into Azure DNS

Install Azure CLI from (here)

Launch PowerShell
#Login to Azure CLI
az login
#List your Subscriptions
az account list
#Select a Subscription
az account set –subscription “My Demos”
#Make sure you see the DNS Zone that you created in step 2
az network dns zone list
#Import Zone from file (Documentation is here)

az network dns zone import -g MyResourceGroup -n mysite.com -f zone.txt

PowerShell Alternative to Azure CLI

Don’t like Azure CLI? You can also manage your zone with the regular PowerShell module:
Install-Module -Name AzureRM.Dns -Force
Install-Module -Name AzureRM.Network -Force
Connect-AzureRmAccount
Get-AzureRmSubscription
Select-AzureRmSubscription -SubscriptionName “My Demos”
Get-AzureRmDnsZone

Azure Conditional Access and Azure AD Connect Service Account

If you deploy an Azure Conditional Access policy to require all Windows PC’s to be domain joined, you may find that Azure AD Connect no longer synchronizes.

And during an upgrade to the latest version of Azure AD Connect, you may be prompted with the error message “System.InvalidOperationException: Showing a modal dialog box or form when the application is not running in UserInteractive mode is not a valid operation.”

To resolve this, modify the conditional access policy to exclude the Azure AD Connect Service Account, which can be found by searching for “On-premises directory synchronization service account”

Then create a second conditional access policy that is targeted this same on-prem account with a condition exclusion for all trusted locations, and a block rule for all other access. This effectively creates an IP-Fence that prevents this service account from logging in from anything other than the trusted location.

Azure AD Premium Conditional Access for Domain Joined Machines

This article is an attempt at discovering what the minimum steps are to get the Conditional Access feature which checks for Domain Join status for both Windows 10 and Windows 7 operating systems.

Conditional Access is a feature of the “Azure AD Premium P1 License” which can be purchased ala carte for $6/user/month, or as part of the “Enterprise Mobility + Security license” for $8.75/user/month, or the new Microsoft 365 SKU announced at the 2017 Inspire conference.

This is what the feature looks like when configuring a Conditional Access Policy in the Azure Portal to only permit domain joined devices:

For more information about Conditional Access, read about it here.

I had the following questions:

  • What does the conditional policy mean by “Domain Join” – is it on-premises or is it Azure AD Domain Join, both, or something else? (Answer: on-prem domain join with an account that has been synced by Azure AD Connect to the cloud… with a software deployment required for Windows 7, and a GPO required for Windows 10).
  • Is it necessary to deploy the Workplace Join v2.1 client to Windows 7 Machines? (Answer: Yes)
  • Does Azure AD Connect require configuration, and if so, what is the minimum version of Azure AD Connect required? (Yes, you must create a service connection point in Active Directory per this article).
  • What role does Azure AD Seamless Single Sign-On Play (also referred to as “Desktop SSO” in the Azure AD Connect documentation) Answer: (It provides a similar SSO experience to ADFS, but only when connected to the corporate network. And it is REQUIRED for Windows 7 machines that wish to have Workplace Join work without an ADFS server).
  • Is ADFS required? (Answer: No)
  • Is there any configuration necessary in Azure AD? (Answer: Not unless you changed the default settings)
  • Is it necessary to deploy a Group Policy change? If so, what are those changes? (Answer: For Windows 10, Yes, see below. For Windows 7, you’ll need to push out some Intranet Site to Zone mappings for the Azure Seamless SSO to work)
  • Is it necessary to create any DNS records? (Answer: Yes, see below)

Domain Join vs Azure AD Domain Join vs Azure AD Registration

If you configure a Conditional Access Policy and select the “require domain joined device” checkbox, what is it checking?

To find out, I created 6 virtual machines to see exactly what works and what does not work.

Computer Name Operating System Configuration Test Results Notes
Win10DomainJoin Windows 10.0.15063 (Creators)
  1. On-Prem Domain Joined
  2. Azure AD Connect “Desktop SSO” is enabled
  3. “enterpriseregistration” DNS CNAME exists
Success
Win10DJandReg Windows 10.0.15063 (Creators)
  1. On-Prem Domain Joined
  2. Azure AD Connect “Desktop SSO” is enabled
  3. “enterpriseregistration” DNS CNAME exists
  4. GPO Applied “Register domain-joined computers as devices”
Success  
Win10DJandAADJ Windows 10.0.15063 (Creators)
  1. On-Prem Domain Joined
  2. Azure AD Connect “Desktop SSO” is enabled
  3. “enterpriseregistration” DNS CNAME exists
  4. Azure AD Domain Joined (aka ‘Workplace Joined’)
  5. GPO *NOT* Applied “Register domain-joined computers as devices”
Success
Win10AADJoined Windows 10.0.15063 (Creators)
  1. Azure AD Joined Only
  2. Azure AD Connect “Desktop SSO” is enabled
  3. “enterpriseregistration” DNS CNAME exists
  4. GPO *NOT* Applied “Register domain-joined computers as devices”
Fail – Got a block page (see block page example below) Wasn’t entirely expecting this to work since the screen tip that is in-band of the configuration says that this checkbox does *not* apply to Azure AD joined machines.

Win7DomainJoin Windows 7 SP1
  1. Azure AD Joined Only
  2. Azure AD Connect “Desktop SSO” is enabled
  3. “enterpriseregistration” DNS CNAME exists
Fail – Got a block page (see block page example below) Wasn’t expecting this to work – just testing to create a baseline before the Workplace Join client was installed. With no ADFS in the environment – just Azure AD Connect with Desktop SSO and Password Hash Sync.
Win7DJwithWPJ Windows 7 SP1
  1. Azure AD Joined Only
  2. Azure AD Connect “Desktop SSO” is enabled
  3. “enterpriseregistration” DNS CNAME exists
  4. Workplace Join v2.1 client installed
SUCCESS I was starting to lose hope after all these failed tests, but we now have a successful test!

The common denominator for the successful test was the DeviceTrustLevel changed to “Managed”

Block Page Example

This is the end-user example of what it looks like when you try to open an application protected by a Conditional Access Policy that requires Domain Join.

DNS Records

According to the documentation, is necessary to register the following DNS CNAME record in both internal and external DNS (if using split-zone / split-brain DNS):

DNS Entry Type DNS Value (Address)
enterpriseregistration.contoso.com CNAME enterpriseregistration.windows.net

Workplace Join v2.1

For Windows 7 and Windows 8.1 devices, the documentation states that it is necessary to deploy the Workplace Join client (MSI Package) from here. This is not required for Windows 10 systems, which can register to Azure AD via group policy, although in my lab that does not appear to be working, as that does not produce any records when I run get-msoldevice. Perhaps it requires ADFS for Windows 10 machines to work with Domain Join conditional access.

Workplace join Version 2.1 (Released June 2017) added support for Azure Active Directory Seamless Single Sign On (https://aka.ms/hybrid/sso).

Ready for some kludge? The installer creates a scheduled task on the system that runs in the user’s context. The task is triggered when the user signs in to Windows. The task silently registers the device with Azure AD with the user credentials after authenticating using Integrated Windows Authentication. To see the scheduled task, in the device, go to Microsoft > Workplace Join, and then go to the Task Scheduler library.

The two main benefits of this tool in my opinion is that it registers a Windows 7 machine in Azure AD, and, the version 2.1 client makes it so that you don’t have to use ADFS (simplifying the configuration).

Azure AD Seamless Single Sign-On

Azure Active Directory Seamless Single Sign-On (Azure AD Seamless SSO) is required for Windows 7 machines if you are not using ADFS. Instead, users will sign in and register to Azure Device Registration Services.

When enabled, users don’t need to type in their passwords to sign in to Azure AD, and usually, even type in their usernames. This feature provides your users easy access to your cloud-based applications without needing any additional on-premises components.

If you have ADFS, you do not need this feature as ADFS already provides “seamless SSO” (assuming you also deployed the ADFS STS web page to your Local Intranet zone in Internet Explorer).

*Note: The ‘Edge’ web browser is not yet supported. Currently IE, Chrome and Firefox are supported. Firefox requires custom configuration to make it work.

To deploy seamless SSO, you turn it on in Azure AD Connect, then you deploy it through Group Policy.

Azure AD Connect

You must be using version 1.1.484.0 or later of Azure AD Connect. Note: In the screen shot below, Pass-through auth is selected but ‘Password Synchronization’ could have been chosen as well.

If you already have an installation of Azure AD Connect, choose “Change user sign-in page” on Azure AD Connect and click “Next”. Then check the “Enable single sign on” option

Completing that step will create a new computer object in Active Directory “AZUREADSSOACC” – if this object is accidentally deleted, users can still logon, but it will just be the standard logon just like prior to seamless SSO being enabled (so it ‘fails open’ so to speak). For more information see the technical deep dive here.

Group Policy

You can add the Azure AD device authentication end-point to the local Intranet zones to avoid certificate prompts when authenticating the device. This works for both IE and Chrome which both share the same setting. For other browsers see the references section.

To roll this out in a group policy object, here are the steps:

  1. Open the Group Policy Management tool on a domain controller, ex: start > run > gpmc.msc
  2. Edit the Group Policy that is applied to some or all your users.
  3. Navigate to User Configuration\Administrative Templates\Windows Components\Internet Explorer\Internet Control Panel\Security Page and select Site to Zone Assignment List

    Enable the policy, and enter the following values (1 indicates Intranet zone) in the dialog box.

    https://device.login.microsoftonline.com

    https://autologon.microsoftazuread-sso.com

    https://aadg.windows.net.nsatc.net

    Note: One of the references only listed the first URL, whereas another reference listed the bottom two. Since the documentation was not consistent, I’m including all three to be safe.

    Note: Rollout the above GPO at your own risk… It will add these and lock out/remove any other intranet site zones your users may have manually configured. My personal preference is to deploy these as group policy preferences instead.

    ADFS

    ADFS is not required as long as you deploy the Workplace Join v2.1 client to your Windows 7 systems, and you deploy Azure AD Seamless SSO.
    Reference: https://docs.microsoft.com/en-us/azure/active-directory/connect/active-directory-aadconnect-sso-faq#i-want-to-register-non-windows-10-devices-with-azure-ad-without-using-ad-fs-can-i-use-seamless-sso-instead

    Azure AD Configuration

    By default, Azure AD enables users to register devices. So unless someone in your organization changed this setting, you should not have to change this. This is found in http://portal.azure.com then find Azure Active Directory > Users and groups > Device settings. The policy “Users may register their devices with Azure AD” must be set to “All” (which is the default setting).

    Windows 10

    All domain-joined devices running Windows 10 Anniversary Update and Windows Server 2016 automatically register with Azure AD at device restart or user sign-in. However, Windows 10 November 2015 Update automatically registers with Azure AD only if the rollout Group Policy object is set. So the best thing to do is configure a Group Policy object to control the rollout of automatic registration of Windows 10 and Windows Server 2016 domain-joined computers.

    Go to Computer Configuration > Policies > Administrative Templates > Windows Components > Device Registration. Right-click Register domain-joined computers as devices, and then select Edit. Select Enabled, and then select Apply.

  • Older GPMC Consoles may see: Computer Configuration > Policies > Administrative Templates > Windows Components > Workplace Join > Automatically workplace join client computers. Select Enabled, and then select Apply.


Testing

You can check successful registered devices in your organization by using the Get-MsolDevice cmdlet in the Azure Active Directory PowerShell module.+

The output of this cmdlet shows devices registered in Azure AD. To get all devices, use the -All parameter, and then filter them using the deviceTrustType property. Domain joined devices have a value of Domain Joined. In my testing, the only combination that seemed to work with conditional access is when the DeviceTrustType was Domain Joined, and the DeviceTrustLevel was Managed.


To test the scenario where the user enters only the username, but not the password:

Troubleshooting

  1. Check to make sure the computer account is syncing to the cloud by running get-msoldevice. If it does not show up there, then make sure the OU or container containing the computer objects is being synced. If it shows up there, it must have DeviceTrustType = ‘Domain Joined’ and DeviceTrustLevel = ‘Managed’
  2. For Windows 10 only, Check to see if the computer object contains a value in the userCertificate attribute. If not, this means that the computer is unable to read the value of the SCP object in Active Directory. Check to make sure that the Authenticated Users group is not missing from the “Device Registration Configuration” object.  To see if it can query the SCP, run this command:
    $config = [ADSI] “LDAP://CN=Device Registration Configuration,CN=Services,CN=Configuration,DC=YourDomain,DC=com”;$config
  3. On Windows 10, Run the dsregcmd /status and make sure ‘AzureAdJoined’ is Yes and ‘IsUserAzureAD’ is Yes
    Under User State, verify that WamDefaultSet is Yes, WamDefaultAuthority is organizations, WamDefaultId is https://login.microsoft.com, AzureAdPrt is Yes, and WamDefaultGUID contains a value.
  4. For Windows 7 only, run autoWorkplaceJoin.exe /i to find out the current status of the device, this will also provide helpful error messages as well.
  5. Enable Debug and Analytic logs in Event Viewer. Click the View menu. Select Show Analytic and Debug Logs to make these logs visible. Enable logs under Applications and Services Logs > Microsoft > Windows > User Device Registration, and then export the logs for Admin and Analytic folders about five minutes after you have rebooted (or signed-out/in)
  6. Check the troubleshooting article https://docs.microsoft.com/en-us/azure/active-directory/device-management-troubleshoot-hybrid-join-windows-current
  7. When pushing out the Workplace Join Client, users may get a pop-up “To continue, this application needs to create a key.”

    To suppress this, you can push out a group policy object to not require user input for storing certificates.


Top 5 Azure Information Protection Limitations

Before I discuss the limitations of any product, I try my best to point out all of the things I appreciate about a product. In general, you will not hear Microsoft tell you about product limitations. I suspect it is a culture thing. But then again, do you expect a new car salesman to tell you about the limitations of the car they are trying to sell you?

So let me first point out that I have been a longtime fan of Microsoft’s Rights Management Services (RMS) which debuted in Windows Server 2003. As the product evolved over the years into what is now called Azure Information Protection, I became an even greater admirer of the product as well as the team within Microsoft responsible for its development.

A key milestone came when RMS was ported to Azure, because it became easy to enable (with one mouse click), eliminating the effort to configure servers on-premises, and especially the underlying Public Key Infrastructure (PKI) environment that RMS required.

With the rise in popularity of Office 365 (100 Million subscribers), many began to take advantage of RMS because it is included for free in the most popular business subscription (known as the “E3” license).

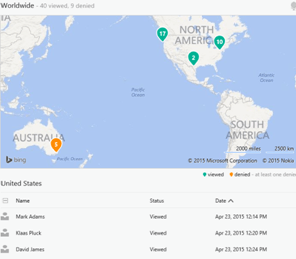
One of my favorite RMS features came in September of 2015, when Microsoft announced Document Tracking and Revocation capabilities (here). I’m still amazed by how cool this feature is, allowing you to see a map of the world and the location of where your documents have been opened!

Another key milestone in the evolution of RMS came when they acquired Secure Islands (announced by Takeshi Numoto on 11/9/2015). Six months later, Dan Plastina (@TheRMSGuy) first announced on 6/22/16 (here) that RMS would be rebranded as “Azure Information Protection” (AIP) and later reached general availability in October 2016 (here).

AIP is a truly jaw-dropping experience. As you are authoring content, the document will automatically be labeled and encrypted with a strong 2048 bit encryption key on-the-fly if sensitive information is found (ex: credit card numbers, social security numbers, or data you define as sensitive using regular expressions).

As a consultant, my job is to listen to customer problems, and then recommend solutions. This leads me to the title of this post – AIP Limitations.

Azure Information Protection Limitations

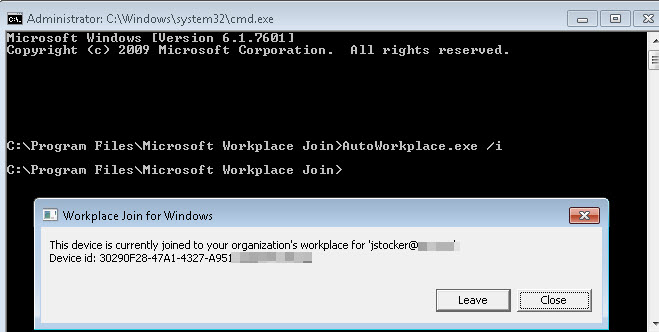
1. External Sharing using AIP with business partners who are still running Office 2010 (or older) needs improvement

When you protect a document with AIP, and you want to send that document to an external user, things go smoothly if they are running Office 2013 or Office 2016.

However, a lot of companies still run Office 2010. This is what their experience would look like:

“Dear External User,

We would like to share sensitive documents with you. If you are running Office 2013 or 2016, and if you have an Office 365 subscription, then you should be able to open the attachments without a problem.

Otherwise, if you are using Office 2010, you will need the following before you can open the documents we send you:

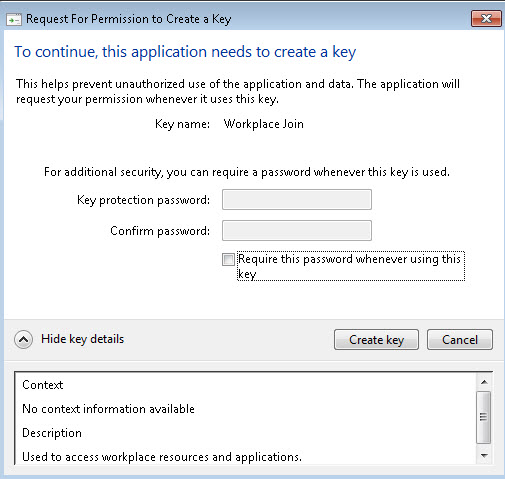
      1. Local Administrator Rights are required to install the Azure Information Protection Client
      2. Download and install the Azure Information Protection Client
        1. If you are running Windows 7, you first need to install KB 2533623 (This will require a reboot)
        2. Note: Office 2010 require Microsoft Online Services Sign-in Assistant version 7.250.4303.0. This version is included with the AIP client installation, however, if you have a later version of the Sign-in Assistant, uninstall it before you install the Azure Information Protection client.
        3. Note: The AIP Client will automatically install the .NET 4.6.2 Framework, so be sure not to deploy this on any machine that has known compatibility issues with the 4.6.2 framework.
      3. Be advised, that in some cases, even if you follow all of the steps above, you may still get an error message when attempting to open an RMS or AIP protected document in Office 2010. The work-around is to create a few registry entries for the service location as documented in the AIP Client Admin guide (here).

If you do not have an Office 365 Subscription, you will need to sign up for “RMS for Individuals” (this is a free identity platform that allows you to open the documents we send to you).”

2. Ad/Hoc External Sharing using an AIP Label is not possible

Let’s say you get a call from a new customer or business partner who wants you to send them a Microsoft Word document. The document is too large to email so you host it in online storage (ex: OneDrive, SharePoint, Dropbox, etc). You might be tempted to click an AIP label that says “Business Partner” or “Client Confidential” but that would not work in the current implementation of AIP, because the Labels must be associated with an RMS Template, and RMS Templates must be associated with Mail Enabled Security Groups, and those Groups must contain a Contact Object. Since normal end-users cannot create contact objects in their Active Directory or Azure Active Directory, they must submit a helpdesk ticket for the external contact to be created, then added to the appropriate Mail Enabled Security Group. You get the picture that this process just broke down fast. Essentially, there is no way with AIP today to associate a label with ad/hoc external sharing. Labels can only be used for defined and known business partners who are pre-configured as contact objects in a group associated with an RMS template that is then tied to a Label. It would be just as exhausting to implement this in a process as it was to type this all out I am sure!

3. There is no Mac OSX client for Azure Information Protection.
The work-around, as best as I can tell, is to have Mac users try the legacy “RMS Sharing App” for Mac OSX. This was the application written before the AIP client was released.

4.In April of 2016, there was a vulnerability discovered in the RMS technology that allows someone with View rights to escalate their privilege and change the document by stripping RMS from the document (which could be potentially undesirable if they then re-share that document with unauthorized parties, or if that document is exposed in the wild (ex: lost/stolen laptop, ransomware, etc). This is documented on Wikipedia here, and proof of concept code is available for testing from GitHub (here). This issue isn’t too great in my opinion, because it requires that one of the named users who is authorized to view the document has to compromise the document. In other words, an unauthorized party cannot break the 2048 bit encryption.

5.OneDrive.
Protecting documents with AIP or RMS automatically when they are uploaded to OneDrive is currently not a great idea. First, Microsoft has removed the navigation button permitting you to do this, so you would have to find the direct hyperlink to the document library settings to enable IRM on your OneDrive document library. Even if you were to do this, it would prevent you from sharing any of those documents with outside users because there is no straight-forward way to make a OneDrive library’s IRM settings understand external users. It essentially ends the ad/hoc sharing capabilities of OneDrive. Perhaps that is why MSFT removed the navigation button for site settings in OneDrive.

Guidance

So given these limitations, what do I recommend?

  • I recommend you use AIP to protect sensitive information that should be accessible to internal employees, or known/named individuals from business partners. When communicating with the business partner for the first time, try to find out if they use Office 2010, and if so, warn them that it will be a rocky road for them (see sample email template above). Fortunately, Office 2013 and 2016 seem to natively open AIP encrypted documents.
  • If you need to share documents with encryption in transit, then use Office 365 Message Encryption (OME). The limitation of OME (today) is that the recipient can save the document and do anything they want to it (the encryption does not follow the attachments after the recipient saves it to their computer). This will be resolved with the upcoming Secure Email feature that was announced at the 2016 Ignite conference.
  • If you need to securely share emails and documents with Gmail users, then wait for the upcoming Secure Email solution that was announced at the 2016 Microsoft ignite conference (watch the video here, starting around the 46 minute mark).

Roadmap

Will things get better? In many cases, yes, however, not for the external user who needs to edit the AIP/RMS protected document using Office 2010.
The proposed Secure Email solution will make it seemless for any user to VIEW AIP/RMS protected documents by providing a web-browser experience. But if the business process requires the external user to make changes and send those back, my understanding is that capability is not going to be in Secure Email when it is released (from what I have heard anyway). To be clear, if the external user is given edit rights, and if they are still on Office 2010, they are going to have the same pain points as I described above with Office 2010.

AIP Licensing

AIP can be licensed in one of four methods:

  1. You can get AIP as a standalone license for $2/user/month.
  2. You can get AIP as part of the Azure Active Directory Premium P1 or P2 license families.
  3. You can get AIP in the Enterprise Mobility + Security E3 or E5 license families.
  4. Or you can get AIP as part of the Secure Productive Enterprise E3 or E5 license families.

If you just need the original RMS capabilities (encryption, access control and policy enforcement) then you can license that individually or as part of the Office 365 E3 license.

If you need the Document Tracking and Revocation Capabilities, you’ll find that in the Enterprise Mobility + Security E3 or Secure Productive Enterprise E3.

Note: AIP automatic labeling is an advanced feature that requires the AADP P2, or EMS E5, or SPE E5 license. Otherwise, the down-level version of AIP requires the user to manually label documents they create.

Moving from Azure Classic to Azure Resource Manager (ARM)

Microsoft has made great strides it making it easy to migrate from Azure Classic (aka IaaS 1.0) to Azure Resource Manager, (aka ARM or what I consider IaaS v2.0).

At a very high level, the process involves migrating the vNet first, which automatically migrates the underlying VM’s. Then the next step is to migrate the storage accounts.

This process is straight-forward and easy to follow the step-by-step guidance in PowerShell (here) and there is a nice video walkthrough (here).

One interesting thing I observed is that the vNet, VM and Storage account will all have the “-Migrated” name appended to the end of the previously named object.

At this time it doesn’t appear possible to rename a resource group (feature request is marked as ‘pending’ on this website here).

The work-around is to create a new resource group and then migrate the migrated objects into the new group.

Avoid Cisco Meraki for S2S VPN with Azure

Just got off a phone call with some engineers at Microsoft who informed me that both Cisco and Microsoft have mutually agreed that using a Cisco Meraki firewall is not recommended for creating site to site (S2S) VPN tunnels to Microsoft Azure.

The issue is the Phase 1 IKE Timeout value that the Meraki uses is not supported.

This was rumored to be fixed in late 2016, and then later in a firmware update in February 2017, but as of yet, we have not seen it yet.

If anyone has updated information on this please post it in the comments as I have a few clients running the Meraki’s.

Thanks,

Joe