This is the first part in a two part blog series on securing Windows Virtual Desktop (WVD). In this first part we are going to setup the lab environment first. To skip the lab build and go right into securing WVD, proceed to part two (here).
First, why WVD? Should you use it? Consider the following:
- If all your corporate applications are SaaS-based, you may not need WVD. You could instead use Microsoft Cloud App Security Conditional Access App Control to provide session proxy to prevent downloads or prevent copy/paste. WVD is a great fit when you need to virtualize applications or avoid pushing applications to desktop computers.
- WVD can be pricey. For 100 users you are looking at a monthly bill ranging between $1,200 to $4,500 depending on whether you select a dedicated host per user or a shared (pooled) design. See the pricing table below for more information. I have also provided two great tips for keeping costs down.
So it really comes down to risk versus reward. If you need to provide a secure environment for people to connect to when you can’t assess the health of their personal machines, then WVD is probably a great value for the price.
So when is WVD a good fit?
- Low bandwidth conditions. Consider a scenario where you have Intune Autopilot configured to ship a new computer to a remote outpost where internet is spotty or low bandwidth conditions. Pushing gigabytes of applications to that new desktop during the OOBE would be a poor experience, negatively impacting employee productivity and potentially their cellular bill depending on usage costs.
- Contractors and Partners. Many organizations reluctantly provide VPN access to contractors and partners who use their own equipment. Who knows whether or not antivirus or encryption is installed and whether those machines have been compromised. WVD is a great alternative to provide remote access to your applications in an environment that you secure. So you may have been doing this already with on-premises RDS Farms or Citrix environments, WVD provides a way to further abstract the environment from your secure network by hosting the virtual machines in the cloud.
Lab Setup
To get started with WVD, let’s walk through what it takes to get a lab created so that we can have something to use for testing the security controls. You will need:
- Time. If you are starting from scratch, you’ll need four to eight hours to complete all the steps in this blog post.
- An Azure Subscription. (Sign up for a free account to get $200 credit here)
- Azure AD Domain Services Enabled (see quickstart guide here and full documentation here). (If you already have a domain controller in your lab, you can use that instead of Azure AD Domain Services). There are pros and cons for each that we will discuss below.
- Credentials to domain join. (If using AAD Domain Services, the user should be a member of AAD DC Administrators).
- A basic to intermediate knowledge of Azure. For example, you know what Resource Groups are, and Azure Networking concepts.
- Optional: Ability to create an external DNS TXT Record for simplified end-user sign-in to WVD
Step 1 – Sign into Portal.Azure.Com and search for Subscriptions.
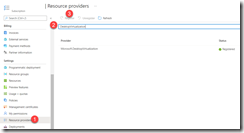
Register the Microsoft.DesktopVirtualization Resource Provider in your Azure Subscription. Browse to your Azure Subscription and search for DesktopVirtualization as shown below and then click Register.
Step 2 – within the Portal.Azure.com administration page, search for Windows Virtual Desktop
Step 3 – Click Create a host pool
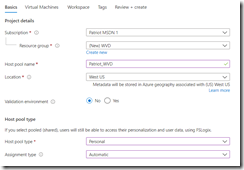
Step 4 – Basics.
Select a Subscription, Resource Group. Assign a name, and select a location. For this lab environment, select “No” for Validation environment. For the host pool type select Personal (so that you can have it turn off later when it is not being used to save costs… this option is not available for Pooled host pools). Select Automatic for Assignment type. For full step-by-step of this wizard, see MSFT documentation here. I’ll summarize the key decisions here.
Step 5 – Virtual Machines. You can do this now or later.
For this lab, we’ll put the VMs in the same resource group as the host pool. We’ll select a simple naming convention prefix, and select the same location as the host pool. We won’t configure any redundancy since its a lab. For the image, we’ll select the Windows 10 enterprise image (you could ‘bring your own image’ if that’s important to you for production). Select the default machine size and ‘1’ for the number of VMs. Go with the defaults SSD OS disk unless you want it to crawl.
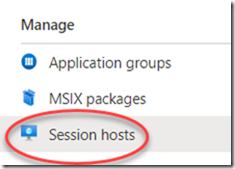
If you decide to add VMs later, then after the Host Pool is created, click Session Hosts on the left navigation.
Networking. Now, the next part is important. For simplicity, select the same virtual network that you created for your Azure AD Domain Services. You did set this up first right? (It is a prerequisite!). If you haven’t done that yet, go back and select “No” for creating VMs now, so you can finish this wizard (You can always add VMs to your Host Pool later). If you need help creating Azure AD Domain Services, I have included a section of this blog post on that (scroll down for the section for creating Azure AD Domain Services).
Important: For the network security make sure you select “No” for the Public inbound ports for enhanced security: WVD uses a reverse tunnel so it is not necessary to unnecessarily allow random internet machines to brute force your RDP hosts. Next, select a Domain Administrator account or account that has permissions to join the machines to Azure AD Domain Services.
Step 6 –> Workspace. You can create a workspace for applications now or later.

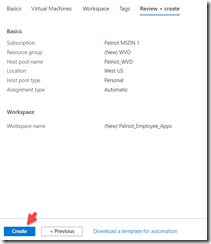
Step 7 –> Create.
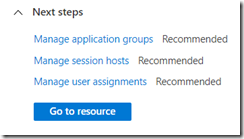
Step 8 –> Additional Recommended Steps:
– Managing Application Groups, Managing Session Hosts, and Managing User Assignments. You have to do this before your lab users can begin testing WVD.
Experts: Automating Lab Setup with PowerShell
If you are an expert with PowerShell and Azure, you can can automate the lab setup process with PowerShell. To install the PowerShell module
Install-Module -Name Az.DesktopVirtualization
Connect-AzAccount
Signing into your Azure account requires a code that’s generated when you run the Connect cmdlet. To sign in, go to https://microsoft.com/devicelogin, enter the code, then sign in using your Azure admin credentials.
After you sign in, get all your subscriptions first:
Get-AzSubscription | Out-GridView -PassThru | Select-AzSubscription
Then set your default subscription so you can make sure you are creating a host pool in the right subscription:
Select-AzSubscription -Subscription <preferredsubscriptionname>
To create a host pool:
New-AzWvdHostPool -ResourceGroupName <resourcegroupname> -Name <hostpoolname> -WorkspaceName <workspacename> -HostPoolType <Pooled|Personal> -LoadBalancerType <BreadthFirst|DepthFirst|Persistent> -Location <region> -DesktopAppGroupName <appgroupname>
This cmdlet will create the host pool, workspace and desktop app group. Additionally, it will register the desktop app group to the workspace. You can either create a workspace with this cmdlet or use an existing workspace.
More information here: PowerShell module Windows Virtual Desktop – Azure | Microsoft Docs
Connecting to the Lab
Many assume that Windows Virtual Desktop uses MSTRC.EXE but it uses msrdcw.exe which is not built-in to Windows and is downloaded separately here:
Windows Client Download: https://go.microsoft.com/fwlink/?linkid=2068602
Other clients are available too:
Web Client: https://rdweb.wvd.microsoft.com/arm/webclient
macOS 10.12 or later client download: https://apps.apple.com/app/microsoft-remote-desktop/id1295203466?mt=12
Android client download: https://play.google.com/store/apps/details?id=com.microsoft.rdc.androidx
iOS client download: https://aka.ms/rdios
Microsoft Store Client Download: https://www.microsoft.com/store/productId/9WZDNCRFJ3PS
Thin Clients Supported: Dell, HP, 10ZiG, IGEL, NComputing, and Stratodesk: Windows Virtual Desktop Thin Client Support – Azure | Microsoft Docs
The Subscribe Button
When you first launch the client, it will prompt to Subscribe using an email address or a URL.
To allow users to subscribe with their email you first need to create a DNS TXT record in your external DNS zone.
- Host Name: _msradc
- Text: https://rdweb.wvd.microsoft.com/api/arm/feeddiscovery
- TTL: 300 seconds, or whatever you want
Note: If you were an early adopter of WVD and using the older classic edition then the Text value above is going to be different. Full instructions are found here.
Deploying WVD Client to users
Since WVD does not use the built-in RDP Client that ships with Windows, Administrators need to think about deploying the WVD client to their users. In most cases I think WVD is going to be used from BYOD workstations, or contractor workstations, which are unmanaged and therefore it will look like an email message sent with instructions for installing the client or guiding them to use the web client URL. However, if you are in the lucky position of controlling the software distribution to the computers that will be connecting to WVD, then the unintended installation looks like this:
Per device: msiexec.exe /I <path to the MSI> /qn ALLUSERS=1
Per user: msiexec.exe /i `<path to the MSI>` /qn ALLUSERS=2 MSIINSTALLPERUSER=1
To learn more about the administration options for the client, such as targeting members of the IT Department to use the Insider builds, click here.
User Experience
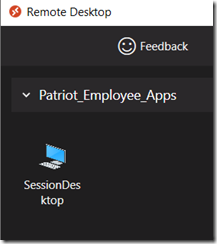
After launching the MSRDC client (not the MSTSC Client!) then the user will see the apps (or desktops) published to them.
Free Community Support for WVD
Get stuck? Have questions? Turn to the WVD Tech Community. Post a question and several MVPs and the Microsoft Product Group team will respond, often within a day. Windows Virtual Desktop – Microsoft Tech Community
Azure AD Domain Services
The virtual machines you provision in Windows Virtual Desktop need to be domain joined. In the host pool wizard you provide a username and password. The assumption is that you have configured the primary DNS in the virtual network to point to a domain controller or AAD Domain Services (for instructions on how to do this click here).
To avoid having to create a DC, you can expose an existing Azure AD to function as a kind of SaaS based domain controller emulator.
Before enabling AAD Domain Services, there are two important considerations:
1. Price. Expect to see a $109 fee appear on the Azure Bill when you enable the “Standard” version of AAD Domain Services (see pricing here).
2. Password Reset is required for Cloud-Only AAD Accounts. If you have cloud-only user accounts, those users must reset their passwords before they can begin to use a virtual machine that is domain joined to AAD Domain Services. This password change process causes the password hashes for Kerberos and NTLM authentication to be generated and stored in Azure AD. The account isn’t synchronized from Azure AD to Azure AD DS until the password is changed. Either expire the passwords for all cloud users in the tenant who need to use Azure AD DS, which forces a password change on next sign-in, or instruct cloud users to manually change their passwords.
Enable Azure AD Domain Services
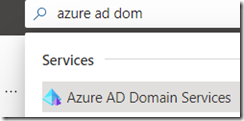
Step 1 –> Sign into Portal.azure.com and Search for Azure AD Domain Services
Step 2-> Click Create Azure AD Domain Services
Step 3-> Complete the wizard as shown below. When selecting the DNS Domain Name, do not use anything you are using today: but I recommend making sure you can purchase the domain name from a public registrar, because if you ever need to do secure LDAP then you can only buy SSL certs from domains you own. This may be a bigger deal for production deployments than this lab scenario.

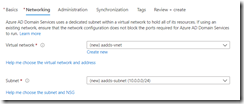
Step 4 –> Select the defaults for the virtual network. (Note: This is for a lab build. If you are designing this for a production environment, there is a lot that goes into this decision, especially the subnet that you select and whether you want that to be routable to on-premises networks).
Step 5 – Add members to the AAD DC Administrators group. The user/s you select can then be used during the WVD wizard for domain joining VMs to AAD.
Before hitting the “Create” button, you are given a warning that several things are “set in stone” and cannot be changed (unless you delete AAD Domain Services and start over).
Be prepared to wait 30 minutes to 1 hour for the creation process to complete, and then you can update the Network Security group to use the IP address of the emulated domain controller, so that during domain join the Virtual Machines can establish a computer account trust with AAD Domain Services.
Don’t want to create AAD Domain Services? Then you’ve got to create a standard Domain Controller, and then setup AAD Connect to sync accounts to your Azure AD Tenant where you’ll then soft or hard match cloud-only accounts to the newly created domain controller. This is not insignificant for a lab build, so that is why we suggested AAD Domain Services.
WVD has limitations and other enterprise considerations (see this MSFT article for more information on some enterprise planning concepts).
Windows Licensing
While you have to pay for the VM compute and storage, the Windows 7 or Windows 10 license costs are included for free inside the virtual machine as long as you have one of the following per user licenses:
- Microsoft 365 E3/E5
- Microsoft 365 A3/A5/Student Use Benefits
- Microsoft 365 F3
- Microsoft 365 Business Premium**
- Windows 10 Enterprise E3/E5
- Windows 10 Education A3/A5
- Windows 10 VDA per user
If you have an active Software Assurance (SA) with Microsoft, then you can also virtualize Windows Server 2012 R2 and higher, using any RDS CAL licenses that you may have purchased in your enterprise agreement.
WVD Pricing
Use a Pooled Host Pool because it is only 25% of the cost compared to a Personal Host pool. However, Personal Host Pools have an option to shut down the VM when it is not being used, so there could be scenarios where a Personal pool could end up costing less if that feature is used. Personal desktops are typically chosen for two reasons: 1) For users that require administrative rights to modify the operating system and want those changes to be retained if the VM is restarted, or 2) For users which run applications that are not compatible with multi-session (Pooled Host).
- A host pool designated for 100 “Personal” VMs will cost $4,545 per month! (See Azure Pricing Calculator here).
- A host pool designated for 100 “Pooled” VMs will cost 75% less at just $1,164 per month
- Discounts up to 72% are available with one-year or three-year reservations.
- Additional cost considerations
- Azure Defender license which is an additional $15 per VM, per month price.
- Azure AD Domain Services is $109.50 per month (see pricing here),
or
A virtualized Domain Controller running in Azure IaaS (approximately about $40 per month depending on the VM size you select, and its best to get two for redundancy, and a VM for Azure AD Connect (About $120 total per month). If you have an existing AD on-premises with Azure AD Connect, then you’ll need to create a Virtual Network Gateway to connect via Site to Site VPN to your on-premises deployment with an existing domain and AAD Connect). I think the gateway is around $40 per month, plus per GB network traffic costs as explained here.
Here are two tips to keep your costs down in a production environment:
- “Start Virtual Machine on Connect” is a feature exclusively available for Personal Pools where the VM is shut down when it is not being used to save costs. To learn more about this preview feature click here.
- Scale Session Hosts automatically. You can use the scaling tool to:
-
-
- Schedule VMs to start and stop based on Peak and Off-Peak business hours.
- Scale out VMs based on number of sessions per CPU core.
- Scale in VMs during Off-Peak hours, leaving the minimum number of session host VMs running.
Learn more about scaling here.
-
-
Troubleshooting
1. If you get the error “We couldn’t connect because there are currently no available resources.” Then check the assignments. The user must be assigned to an Application Group, and a Workspace must be assigned to an Application Group. User –> Application Group –> Workspace –> Application.
2. MSRDC Error “the remote computer that you are trying to connect to requires network level authentication.” This can happen for cloud-only accounts that did not change their password *after* AAD Domain Services was installed. Change your password in Azure AD and then try again.
3. Error Code 1355 when trying to join the VM to Azure AD Domain Services. To get access to the log file on the VM, you need to open RDP 3389 with a public IP address assigned to the NIC, then update the Network Security Group to permit TCP 3389 from your IP (ideally not to the whole internet) for troubleshooting, so that you can gain access to the local logs on the server. Just-in-time Access is more secure but requires an Azure Security Center subscription. When you gain access, you can obtain the raw error logs from:
C:\WindowsAzure\Logs\Plugins\Microsoft.Compute.JsonADDomainExtension\1.3.6
For example, look for “Computer failed to join domain “______” from workgroup ‘WORKGROUP.’ This will often lead you to realize that the domain named used to create AAD Domain Services isn’t the same as the FQDN portion of the email address (UPN) used during the wizard to join the VM.
So let’s say you entered [email protected] as your AD Domain join UPN because that’s the true Global Admin UPN for Azure AD. Since your AAD Domain Services domain is most likely something different, like addscontoso.com, you need to enter the username like: [email protected] and then magically behind the scenes it knows to use the credentials from the real Azure AD domain.
Feedback
Did I miss anything? Have any tips? Please share your feedback with me on Twitter @ITGuySocal
Part two – Securing WVD
Now that your WVD lab is built, it’s time to learn more about securing WVD. To continue, click here for part two.

