Category Archives: Office 365

Top 3 reasons I should have adopted Outlook App for iOS a long time ago


1. Send Availability

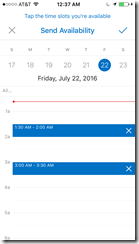
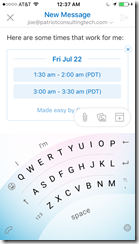
How often do we get an email like “are you available to meet tomorrow.”  Now, when I reply, I can click a button and select available time slots, and with one more button press, I can quickly send my availability! In this manner, it is actually more efficient than the current Outlook full client!  The closest thing we have to this in the full Outlook  client is the  ‘FindTime’ app in Outlook.

imageIMG_0035IMG_0036


2. Attach Files or Photos while composing email

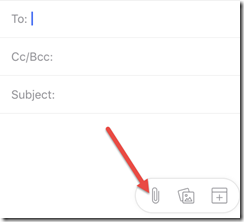
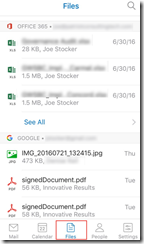
This is a huge advantage over the native iOS mail client, I still remember when I used an iPhone for the first time and could not find any way to attach a file to an email I was drafting. My friend snickered, “that’s because you have to go to the photo first, then click share, then draft your email.” Hmmm.. okay… I guess but that wasn’t completely obvious to me. So I love the more natural ability to attach a file after I start composing a new email. What I like even more is that it shows me files that have recently been sent to me in email, as well as files I have in my OneDrive (and other storage providers too).

imageSNAGHTML124db2f0

3. Consume RMS protected attachments sent from “RMS sharing app”

One of the main obstacles for adoption of RMS is the lack of support for it on mobile devices. Now, with the Outlook App for iOS, I can open RMS protected content when it is sent from the RMS Sharing App.  What doesn’t work is opening RMS protected email messages although it is apparently supposed to work according to this article (here). Perhaps it is a bug in the latest iOS client since it is listed as being a supported feature.

IMG_0030

No Significant Drawbacks

One of the features I liked about the native mail client in iOS is the ability for multiple mail accounts to be added (for example, the ability to quickly check both business and personal email accounts). Happily, this feature works the same in Outlook App for iOS,, and I have not found any other productivity loss.

I have occasionally come across a few instances where the Outlook App for iOS is not detected as a mail client, for example, in Safari it was not one of the default actions when I needed to forward a URL via email. I was able to easily add it to the Safari quick actions, so that wasn’t too difficult. I think there was one other native app that was looking for an account registered as a native account, which I no longer have, so it failed to work. Other than that one drawback, I am very happy with the new productivity enhancements I have gained.

So I have switched from using the native mail client in the iOS to using the Outlook App for iOS and so far I am only wishing I made this switch earlier!

AutoMapping stuck after mailbox migration

After migrating a mailbox to Office 365 Exchange Online, if the mailbox previously had full access permissions prior to the migration, then after the mailbox migration is finished the user may receive lots of authentication prompts. This happens by design since cross-forest permissions are not supported. Mailboxes that require full-access and/or send-as permissions should be migrated together in groups to avoid this issue.

But what happens if someone overlooks this requirement and moves a mailbox without moving the shared mailboxes along with it? This is where it gets very interesting. While it is possible to remove the full-access permission from the on-premises mailbox, that change won’t sync or take any effect and doesn’t solve the issue. Likewise, migrating the mailbox to Office 365 with the permissions removed prior to the shared mailbox migration won’t solve the problem (you might expect the original mailbox to see the newly migrated mailbox and that it no longer has full-access, and that would be enough to remove the AutoMapping feature). However, no, that is not how it works. To remove the auto-mapped shared mailbox, you have to migrate the shared mailbox, add the full access permission, then remove it again. That triggers the delegate’s outlook to remove the shared mailbox from the left navigation in Outlook.

How to stop email spoofing using DMARC

Did you know that 91% of successful data breaches started with a spear-phishing attack? (According to research from Trend Micro).

Two of my customers have informed me that their top executives’ email have been ‘spoofed’ by hackers. I have included the message headers from those spoofed emails in the blog post below (scrubbing the names to protect the innocent).

The hackers are exploiting a weakness in the Simple Mail Transport Protocol (SMTP) to masquerade themselves as a top executive, who then send an urgent email to staff to click a hyperlink or open an attachment. You can imagine what happens next: the computers get infected by Ransomware like CryptoLocker, encrypting not only hard drives, but also entire departmental file shares. Check your backups – this may be your only option to recover data that has been encrypted. The latest variants of ransomware are now trying to erase network connected backup storage too – so be extra vigilant to keep an offline copy of your backups.  

So when my customers asked me what they can do to prevent email spoofing,  I asked for a copy of the message headers that the attackers used and found out that the emails were getting through despite failing Sender Policy Framework (SPF) checks. SPF checks are the most common method to combat email spoofing. In this article I will describe how DMARC can better enforce your SPF record values to prevent spoofed email from passing through. I recently did a survey of 200 companies and found that only 12% have implemented DMARC so far. 

SPF is implemented by creating a type of DNS record called a ‘TXT’ that contains an authorized list of senders for that particular email domain. However, many companies have not implemented the most hardened syntax for the SPF record, known as the hard fail “-all.” Instead, they are implementing the soft fail “~all.” This allows for emails that do not match the authorized list of servers to pass through, albeit with a higher spam confidence level (SCL) score. 

Up until recently, it seemed as if SPF was all that was required to cause email filters to adjust the SCL high enough to cause spoofed emails to go into a quarantine or junk mail folder. All that started to change when the attackers started to use valid email servers hosted by trusted email providers such as GoDaddy. This caused the SCL score to be low enough for the email to pass through as legitimate “enough” to look like a standard email.

Additionally, and probably more significantly, hackers are now spoofing the RFC 5322.From header which cannot be detected by an SPF check. SPF is great for protecting against attacks where the 5321.MailFrom header is spoofed. Where SPF has problems is when the 5322.From header (the address that you see in Outlook).

Scroll down to see the (scrubbed) message headers in detail.

How do we stop spoofed emails?

Enter DMARC, which stands for “Domain-based Message Authentication, Reporting & Conformance”, is an email authentication protocol. It builds on the widely deployed SPF and DKIM protocols, and was submitted as RFC 7489 on March 18th 2015.

In a nutshell, DMARC is another type of DNS TXT record that builds on SPF and DKIM records and can be configured to specifically tells email filters to reject emails that did not originate from the senders authorized from the SPF or DKIM records. This is enough to stop spoofed emails cold in their tracks. Here is an example of a DMARC record:

v=DMARC1; p=quarantine; rua=mailto:[email protected] 

What this does is to send items to quarantine if the SPF record or DKIM checks fail, and to send reports to an email address that you specify. 

Prior to implementing a DNS record type for DMARC, it is important to talk to your marketing department for a list of companies that they send emails through, for example MailChimp. Those services must be in the SPF record otherwise they will be rejected. After the SPF has been updated, the hardfail setting should be changed to “-all” and the DMARC setting should be configured to reject. Organizations that aren’t sure which services their marketing companies are using can enable DMARC in monitoring mode so that they can first learn who is sending emails out. 

To test out your email system, you can send emails to these addresses and get a report back:

1. If you wish to receive the results at the address in the “mail_from,” the sample message should be sent to [email protected].

2. If you wish to receive the results at the address in the “from” header, the sample message should be sent to [email protected].


Disclaimer: All content provided is for informational purposes only. Use at your own risk. 

Message Header Analysis

Take a look at these two spoofed message header (names have been changed to protect the innocent): 

First Example – Spoofed email originating from GoDaddy

Authentication-Results: spf=permerror (sender IP is 184.168.200.142)
smtp.mailfrom=contoso.com; contoso.com; dkim=none (message not signed)
header.d=none;contoso.com; dmarc=none action=none header.from=contoso.com;
Received-SPF: PermError (protection.outlook.com: domain of contoso.com used an
invalid SPF mechanism)
(envelope-from <[email protected]>)
From: (Real CEO’s Full Name) [email protected] <– RFC 5322.From
To: (Unsuspecting End-User – Probably in Accounting Department) <[email protected]>
Subject: Let Me Know Asap!!
Reply-To: <[email protected]> (Attacker’s address, or unsuspecting innocent 3rd party)
Mail-Reply-To: [email protected] (Attacker’s address, or unsuspecting innocent 3rd party)
X-Sender: [email protected]
X-AntiAbuse: Primary Hostname – p3plcpnl0222.prod.phx3.secureserver.net
X-AntiAbuse: Original Domain – contoso.com
X-AntiAbuse: Sender Address Domain – contoso.com
X-Get-Message-Sender-Via: p3plcpnl0222.prod.phx3.secureserver.net: authenticated_id: noreply@(LegitimateEmailDomainAtGoDaddy)
Return-Path: [email protected]

Second Example – Spoofed email originating from POBOX.com

Return-Path: <[email protected]>
X-Env-Sender: [email protected]
X-SpamWhitelisted: domain whitelist
X-StarScan-Version: 8.11; banners=contoso.com,-,contoso.com
X-VirusChecked: Checked
Received: (qmail 121067 invoked from network); 21 Mar 2016 16:38:30 -0000
Received: from pb-sasl-trial1.pobox.com (HELO pb-sasl-trial1.pobox.com)
DHE-RSA-AES256-GCM-SHA384 encrypted SMTP; 21 Mar 2016 16:38:30 -0000
Received: from pb-sasl-trial1.pobox.com (localhost [127.0.0.1]) by
pb-sasl-trial1.pobox.com (Postfix) with ESMTP id 8D0A21017B for
<[email protected]>; Mon, 21 Mar 2016 12:38:30 -0400 (EDT)
DKIM-Signature: v=1; a=rsa-sha1; c=relaxed; d=pobox.com; h=mime-version
:content-type:content-transfer-encoding:date:from:to:subject
Received: from pb-wm-sasl1.int.icgroup.com (pb-wm-sasl1.int.icgroup.com
[10.80.80.58]) by pb-sasl-trial1.pobox.com (Postfix) with ESMTP id 7F0521017A
for <[email protected]>; Mon, 21 Mar 2016 12:38:30 -0400 (EDT)
Received: from webmail.pobox.com (unknown [10.80.80.19]) (using TLSv1.2 with
cipher ECDHE-RSA-AES256-GCM-SHA384 (256/256 bits)) (No client certificate
requested) by pb-wm-sasl1.pobox.com (Postfix) with ESMTPSA id 0A27539EC9 for
<[email protected]>; Mon, 21 Mar 2016 12:38:30 -0400 (EDT)
Date: Mon, 21 Mar 2016 17:38:29 +0100
From: Real CEO’s Full Name [email protected] <– RFC 5322.From
To: <[email protected]>
Subject: Invoice Payment
Reply-To: <[email protected]> (Attacker’s address, or unsuspecting innocent 3rd party)
Mail-Reply-To: [email protected] (Attacker’s address, or unsuspecting innocent 3rd party)
X-Sender: [email protected]
User-Agent: Roundcube Webmail/1.1.1
X-Pobox-Relay-ID: 57FC50A6-EF83-11E5-B2BA-E24DCCAB2AED-19029152!pb-wm-sasl1.int.icgroup.com.pobox.com
X-MS-Exchange-Organization-AuthSource: RealExchangeServerHostName.contoso.com
X-MS-Exchange-Organization-AuthAs: Anonymous

And here is how authentic the email would look to the recipient:

—–Original Message—–
From: Real CEO’s Full Name [mailto:[email protected]]
Sent: Monday, March 21, 2016 9:53 AM
To: (Unsuspecting End-User – Probably in Accounting Department) <[email protected]>
Subject: RE: Invoice Payment

Jane,

I need you to process an urgent payment, which needs to go out today as a same value day payment. Let me know when you are set to proceed, so i can have the account information forwarded to you once received.

Awaiting your response.

Regards
Thanks.


Sent from my iPad

I am in the office today.

—–End Original Message—–

O365 and DMARC

Because SPF fails, and because DKIM can fail, and because this is all due to routing, EOP will not enforce DMARC failures if your primary MX does not point to EOP. EOP can still detect if a message passes DMARC when the DKIM-signature passes.

https://blogs.msdn.microsoft.com/tzink/2014/12/03/using-dmarc-in-office-365/

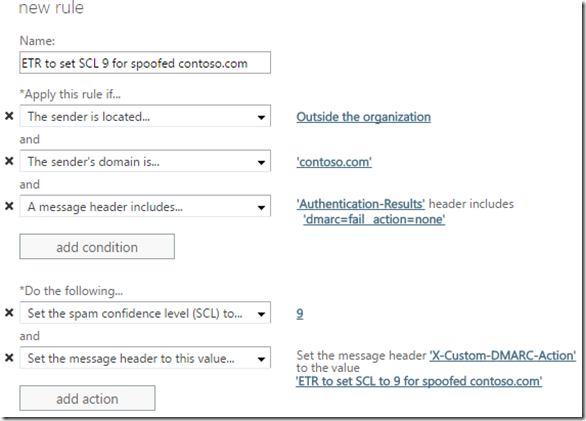
For Office 365 customers, if you do not set the DMARC value to p=reject, then it is recommended to create a message transport rule to set the spam confidence level to 9 so that it doesn’t hit the user’s inbox. The advantage of this is that your domain cannot be spoofed by outside senders for inbound messages to your organization which is common in spear phishing, yet marketing messages that go over the Internet are not affected.
image

Summary

In the first example, the email passed through the Exchange Online Protection filters. In the second example, the email was passed through MessageLabs filters. In the second example, since there was no hyperlink or attachment, we can only assume that the reply TO address was the attacker’s actual email address. Whereas in the first example, the reply TO address was forged because the attacker only wanted the recipient to click on a hyperlink.

After implementing DMARC, the message header section “Authentication-Results”  will contain instructions to reject both of these emails.

Dmarc relies upon SPF *or* DKIM. So if you can’t do outbound DKIM signing, you can still enforce DMARC on an SPF hard fail to prevent inbound mail from coming through as spoofed.

Advanced Threat Protection from compromised Vendors

DMARC provides an excellent layer of defense to add to your defense in depth security policy, preventing spoofed mails from reaching your internal users. For situations where an attacker is not spoofing your domain, but is instead spoofing one of your trusted Vendors domains, DMARC would have to be implemented by your Vendor before it would protect you. In the trusted Vendor scenario, you can best protect yourself by adding an advanced layer of protection to scan for phishing hyperlinks and zero-day vulnerabilities that are not yet in virus definition files. One such solution is Microsoft Advanced Threat Protection (ATP). ATP will detonate attachments in a cloud-hosted virtual machine and observe it for malicious intent before delivering it to your end-users. It will also replace Hyperlinks with ‘safe links’ which are scanned at the time the user clicks on the hyperlink. For more information on Advanced Threat Protection, or to schedule a free consultation to have Patriot Consulting configure it in your Office 365 tenant free-of-charge, contact us at [email protected].

References

Demarc Deployment Tools, Generators and Checks: ttps://dmarc.org/resources/deployment-tools/

For more information on DMARC, check out www.dmarc.org

www.dmarc.org

https://dmarc.org/wiki/FAQ#How_does_DMARC_work.2C_briefly.2C_and_in_non-technical_terms.3F

https://blogs.technet.microsoft.com/eopfieldnotes/2015/02/26/using-dmarc-to-prevent-spoofing/

https://blogs.msdn.microsoft.com/tzink/2014/12/03/using-dmarc-in-office-365/

https://blogs.msdn.microsoft.com/tzink/2015/03/03/best-practices-for-exchange-online-protection-customers-to-align-with-dmarc/

https://blogs.msdn.microsoft.com/tzink/2015/03/13/how-to-align-with-spf-and-dmarc-for-your-domain-if-you-use-a-lot-of-3rd-parties-to-send-email-as-you/

Simple Bulk Licensing Script for Office 365

I am sometimes asked for a very simple PowerShell script that can be used to apply licenses to Office 365 users in bulk. This is handy when you have a large amount of users who need to be assigned a license, for example, an Exchange Online license.

The bulk licensing script is available for download from Script Center Gallery on TechNet here:

https://gallery.technet.microsoft.com/scriptcenter/Simple-Bulk-Licensing-99e6d8c8

Prerequisites:

Azure AD Module for PowerShell

Need help with your next Office 365 Project? We can help you deploy any or all of the 21 features Included in Office 365 for a flat rate per month.  Contact us at [email protected].

Changes to Azure AD Connect Sync Scheduler

The latest builds of Azure AD Connect, beginning with (build 1.1.105.0 Feb 2016) no longer rely on the Task Scheduler for scheduling when the directory sync runs.

Also, the default interval has changed from 3 hours to 30 minutes.

What’s really interesting is that Microsoft is now communicating that the most frequent interval that synchronizations can occur is now 30 minutes. You can try setting it to a lower value but the ‘CurrentlyEffectiveSyncCyleInterval’ shows you that they are ignoring you and setting it at the ‘AllowedSyncCyleInterval’ value of 30 minutes (see screen shot).

image

There is also a new method for manually forcing a sync: If you need to manually run a cycle, then from PowerShell run Start-ADSyncSyncCycle -PolicyType Delta.  To force a full sync type Start-ADSyncSyncCycle -PolicyType Initial

The previous methods for forcing a sync were running the task scheduler or using DirectorySyncClientCmd.exe. In earlier versions it was using Start-OnlineCoexistenceSync. So depending on the version of Dirsync, there could be at least three different methods to force a sync. This blog article (here) by Rhoderick Milne [MSFT]  gives a good historical overview of the previous releases and methods of forcing a sync as it has changed a few times.

This does not apply to you unless you manually upgrade to the latest version or if you are a new customer and downloaded the latest version of Azure AD Connect.

The instructions and usage for the new scheduler are located (here).

I noticed that after running a full sync and several delta syncs, that the users in the portal show as ‘In the Cloud’ rather than the expected ‘Synced with Active Directory.’  I closed and re-opened my browser and then they showed the correct status of ‘Synced with Active Directory.’ So there appears to be a bug with the browser interface where it is caching the ‘Status’ column and not updating after a directory sync. Interesting! So if you encounter this, try closing and re-opening the browser.

Need help with your next Office 365 Project? We can help you deploy any or all of the 21 features Included in Office 365 for a flat rate per month.  Contact us at [email protected].

Crawl OneDrive Sites to report usage information

I just uploaded a PowerShell script to the Microsoft Technet ScriptCenter that provides reporting information on OneDrive usage, with a CSV output of each user’s usage.

report

The script can be downloaded from here: Crawl all OneDrive Folders

This is helpful because the two built-in reports available in the Office 365 Admin Portal do not provide details on per-usage usage. They provide high level aggregate data only.

image

Need help with your next Office 365 Project? We can help you deploy any or all of the 21 features Included in Office 365 for a flat rate per month.  Contact us at [email protected].

Office 365 Education “Domain in Use”

When it comes to planning an Office 365 migration, there is one gotcha that can be a surprise that is only found when signing up for a new Tenant. Surprise! Your domain name is not available because it has been registered in another tenant! Say what? While it is difficult to prevent this from happening (for reasons I will describe later in this post), there is some upfront planning you can be prepared to take if you encounter this during your tenant registration process.

This is more likely to occur with Education customers than Commercial/Enterprise/Business customers. More often than not, Education customers will find that their domain name is already associated with an existing Office 365 tenant that they did not create. However, this same problem can occur with Corporate customers because Power BI allows for automatic tenant creation when the first user signs up (if there was no previous tenant created with the primary email address of the user). 

In this blog post, we will focus mainly on Education customers, because it happens much more often. How does this happen? It’s by design. A self-provisioned tenant gets created whenever a student or faculty member signs up for Office “Online” using their .EDU email address at this website here:

http://office.com/student

image

The first account to do this will actually establish an Office 365 tenant for that organization. This is a huge help to larger organizations with small IT staff, as it enables students and staff to have self-service access to valuable and free services from Microsoft.

Side note 1:Some schools have purchased Campus agreements with Microsoft, allowing teachers and students to install the full Office applications on up to 5 PCs or Macs (not just browser-based Office Online) .  If your school provides this additional benefit, you’ll see the Install Office button on your Office 365 home page after you complete sign-up.

Side note 2: Microsoft has provided a promotion kit to help schools get the word out about the tremendous value of these services. This can help boost the schools image when trying to compete for incoming students $$$.

The tradeoff for free and easy is that the tenant name that gets created may not be the most ideal for long term use, for example: if a student name Jack using the email address of [email protected] is the first to sign up for the free Office Professional Plus offer, and the tenant that gets created behind the scenes could be contoso2.onmicrosoft.com.  To learn more about self-provisioning see this article (here).

Here are the licenses that the student will be assigned if self-provisioned:

image

To disable automatic tenant join for new users: Set-MsolCompanySettings -AllowEmailVerifiedUsers $false

To enable automatic tenant join for new users: Set-MsolCompanySettings -AllowEmailVerifiedUsers $true

This applies to all Office 365 Education customers (Universities, Colleges, School Districts, etc)  – simply, any domain name ending in .EDU.  This blocking prevents new users in your organization from signing up for Power BI.

To learn more about disabling self-provisioning click (here).

It is possible to perform re-claim administrative authority over a self-provisioned Office 365 tenant. Some reasons why you may want to do this include:

  • Establish single-sign on with an on-premises Active Directory or 3rd party SSO service
  • Enforce IT or Security policy settings, especially because the default settings in an Office 365 tenant may or may not reflect the current policy of the organization (sharing policies, encryption policies, software installation, just to name a few examples).
  • Perform an on-premises migration of Email, SharePoint, or storage to Exchange Online, SharePoint Online or OneDrive for Business
  • If the organization has a long term initiative around tenant consolidation, user initiated tenants based on email enabled sub-domains may not be desired.
  • For multi-national organizations, user initiated tenants may be created in a data center that is not desired by the organization.
  • Self-created tenants could be perceived as ‘shadow IT’ – where there is limited organizational visibility or even knowledge of what users have signed up for the services, and usage of those services.

There are many other reasons why it is advantageous to perform the administrative takeover of an Office 365 tenant, but those are the top three.

Before you begin the takeover process (described here) –  you’ll first need to decide if you want to keep two separate Office 365 tenants, consolidate the accounts, or chose one versus another one. There are two good reasons for this:

1. Because your domain can only be associated with one Office 365 account.

2. The self-service tenant very likely has a number of faculty and students who may have data saved in OneDrive. Removing the domain name from the self-service tenant would cause data loss of anything stored in OneDrive, and will disrupt the users who were relying upon their cloud identity to register with Office 365. This is because passwords do not migrate over from the self-service tenant to the new tenant, and in many cases you would not want them to anyway, because you may want to use on-premises AD as the source of authority for authentication.   


Need help with this takeover process, or guidance with your next Office 365 Project? We can help you deploy any or all of the 21 features Included in Office 365 for a flat rate per month. To learn more about our Cloud Advisory Service, click here, or contact us at [email protected].

ExpressRoute Providers in Southern California

If you work in Southern California, you may be interested in finding out which telecommunications providers have connectivity into Microsoft Data Centers such as Azure and Office 365.

The list below ranks providers based on their proximity to Southern California. For the full list of locations and providers, scroll down.

image

Note: This is not an endorsement for any particular provider, but just a list of those who have local connections near Los Angeles.

Need help with your next Office 365 Project? We can help you deploy any or all of the 21 features Included in Office 365 for a flat rate per month.  Contact us at [email protected].

The full list of providers is located here: https://azure.microsoft.com/en-us/documentation/articles/expressroute-locations/

Delve Analytics First Look

In a previous post (here) I described how to enable Delve Analytics at the tenant level. After that has been enabled, the end-user can then enable it for themselves through a few clicks.

As an end-user first signing into the new Delve Analytics (part of the new Office 365 E5 license) we are first greeted with this welcome screen:

image

image

Click on Analytics on the left navigation pane

image

Click on ‘Go to Feature settings’

image

Enable Delve Analytics

image

Note the highlighted message ‘It may take up to a week for all changes to take effect’

Screen shots below. Before you judge me for not working a lot, keep in mind this is just my lab environment. Really !! =)

image

SNAGHTMLa1c1afe

image

image


Need help with your next Office 365 Project? We can help you deploy any or all of the 21 features Included in Office 365 for a flat rate per month.  Contact us at [email protected].

What is included in the Office 365 E5 license?

Many customers are asking what is included in the new E5 license that was announced on December 1st, 2015. The E5 license introduced several new products, and since it includes everything that exists in the E3 license, I thought it would be helpful to list all 20 features here:

       1. Office 365 Advanced eDiscovery

       2. Customer Lockbox

       3. Advanced Threat Protection

       4. Delve Analytics

       5. Power BI Pro

       6. Skype for Business Cloud PBX

       7. Skype for Business PSTN Conferencing (UNLIMITED CONFERENCE MINUTES – available now in 45 countries…   Toll-Free is not yet available but when it does become available, it will be an additional per minute charge)

       8. Skype Broadcast Meeting  (Note: requires latest Skype for business client for all presenters) (Note: all attendees require computer audio, as PSTN dial-in is not yet available for SFB Broadcast meeting)

       Note: Skype PSTN Calling is a separate add-on and is not included in the E5. However, remember that PSTN Calling is an ‘additive’ SKU that must be coupled with either E5 or a stand-alone Cloud PBX SKU).


The following 12 features are also included in the E5, as they are inherited from the E3:

       9. The latest desktop version of Office (aka Office 365 Pro Plus)

       10. Skype for Business Online (Plan 2) -> IM&P, Desktop Sharing, Web Conferencing, Peer to Peer Audio/Video Conferencing, (Dial-In PSTN conferencing from 3rd parties or MSFT can be added onto this E3 for $4/user/month)

       11. Exchange Online (Plan 2) (Unlimited Cloud Storage)

       12. SharePoint Online (Plan 2) (1TB storage per tenant, 500MB per user)

       13. OneDrive for Business (Unlimited Cloud Storage per user)

       14. Office Online

       15. Delve

       16. Sway

       17. Office 365 Planner Preview

    18. Azure Rights Management

19. Data Loss Prevention & Legal Hold

20. Azure Active Directory Basic

21. Voicemail


All of the above is available for just $35/user/month!

Need help with your next Office 365 Project? We can deploy all 21 features listed above for a flat rate per month.  Contact us at [email protected] to learn more.