Category Archives: Office 365

Office 365 Groups Expiration Review

This is a quick review of the new groups expiration feature in Office 365.

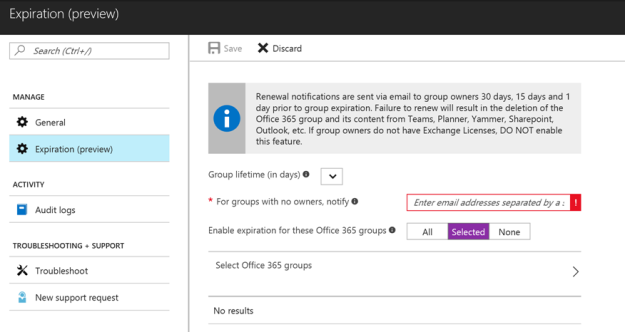
Pros: Very simple to configure – set a group expiration of 180, 365, or Custom.

Then enter an email address of someone to notify if a group does not have an owner.

Those two settings make perfect sense.

The third setting is why I am writing this blog post. The setting ‘Enable expiration for these Office 365 groups” [All] [Selected] or [None]

Let’s dissect this a bit…

ALL probably makes sense …

None might make sense…


But I’m having a hard time understanding when I would select certain groups for expiration. You see, by the very nature these Groups are very dynamic usually – by default, any user can create a group. So if today I pick a set of 15 groups that I want to expire, then tomorrow there could be 30 more created that will not expire. So then, I would have to continuously come back here and update that list if there were some groups that I did not want to have deleted. So my choice would then have to be revert to the None setting.

What’s really needed is an exclusion list, ex: Expire all groups EXCEPT for these 5 that I really really care about. All the others, let the owners decide if they want to keep them, but these 5, I keep important stuff in there, and I don’t want to sweat it about missing an email and potentially losing all that information.

So Microsoft, I hope you are listening, please add an Exclusion button. I posted this idea to the UserVoice site here if you want to vote on it!

https://office365.uservoice.com/forums/286611-office-365-groups/suggestions/31010725-office-365-groups-expiration-need-exclusion-feat


End of Support for Office for Mac 2011

Microsoft will end support for Office for Mac 2011 on Oct. 10, 2017 (a date set two years ago). After that date, Microsoft will no longer provide patches for security vulnerabilities or fixes for other bugs, and halt both free and paid assisted support.

Azure AD Premium Conditional Access for Domain Joined Machines

This article is an attempt at discovering what the minimum steps are to get the Conditional Access feature which checks for Domain Join status for both Windows 10 and Windows 7 operating systems.

Conditional Access is a feature of the “Azure AD Premium P1 License” which can be purchased ala carte for $6/user/month, or as part of the “Enterprise Mobility + Security license” for $8.75/user/month, or the new Microsoft 365 SKU announced at the 2017 Inspire conference.

This is what the feature looks like when configuring a Conditional Access Policy in the Azure Portal to only permit domain joined devices:

For more information about Conditional Access, read about it here.

I had the following questions:

  • What does the conditional policy mean by “Domain Join” – is it on-premises or is it Azure AD Domain Join, both, or something else? (Answer: on-prem domain join with an account that has been synced by Azure AD Connect to the cloud… with a software deployment required for Windows 7, and a GPO required for Windows 10).
  • Is it necessary to deploy the Workplace Join v2.1 client to Windows 7 Machines? (Answer: Yes)
  • Does Azure AD Connect require configuration, and if so, what is the minimum version of Azure AD Connect required? (Yes, you must create a service connection point in Active Directory per this article).
  • What role does Azure AD Seamless Single Sign-On Play (also referred to as “Desktop SSO” in the Azure AD Connect documentation) Answer: (It provides a similar SSO experience to ADFS, but only when connected to the corporate network. And it is REQUIRED for Windows 7 machines that wish to have Workplace Join work without an ADFS server).
  • Is ADFS required? (Answer: No)
  • Is there any configuration necessary in Azure AD? (Answer: Not unless you changed the default settings)
  • Is it necessary to deploy a Group Policy change? If so, what are those changes? (Answer: For Windows 10, Yes, see below. For Windows 7, you’ll need to push out some Intranet Site to Zone mappings for the Azure Seamless SSO to work)
  • Is it necessary to create any DNS records? (Answer: Yes, see below)

Domain Join vs Azure AD Domain Join vs Azure AD Registration

If you configure a Conditional Access Policy and select the “require domain joined device” checkbox, what is it checking?

To find out, I created 6 virtual machines to see exactly what works and what does not work.

Computer Name Operating System Configuration Test Results Notes
Win10DomainJoin Windows 10.0.15063 (Creators)
  1. On-Prem Domain Joined
  2. Azure AD Connect “Desktop SSO” is enabled
  3. “enterpriseregistration” DNS CNAME exists
Success
Win10DJandReg Windows 10.0.15063 (Creators)
  1. On-Prem Domain Joined
  2. Azure AD Connect “Desktop SSO” is enabled
  3. “enterpriseregistration” DNS CNAME exists
  4. GPO Applied “Register domain-joined computers as devices”
Success  
Win10DJandAADJ Windows 10.0.15063 (Creators)
  1. On-Prem Domain Joined
  2. Azure AD Connect “Desktop SSO” is enabled
  3. “enterpriseregistration” DNS CNAME exists
  4. Azure AD Domain Joined (aka ‘Workplace Joined’)
  5. GPO *NOT* Applied “Register domain-joined computers as devices”
Success
Win10AADJoined Windows 10.0.15063 (Creators)
  1. Azure AD Joined Only
  2. Azure AD Connect “Desktop SSO” is enabled
  3. “enterpriseregistration” DNS CNAME exists
  4. GPO *NOT* Applied “Register domain-joined computers as devices”
Fail – Got a block page (see block page example below) Wasn’t entirely expecting this to work since the screen tip that is in-band of the configuration says that this checkbox does *not* apply to Azure AD joined machines.

Win7DomainJoin Windows 7 SP1
  1. Azure AD Joined Only
  2. Azure AD Connect “Desktop SSO” is enabled
  3. “enterpriseregistration” DNS CNAME exists
Fail – Got a block page (see block page example below) Wasn’t expecting this to work – just testing to create a baseline before the Workplace Join client was installed. With no ADFS in the environment – just Azure AD Connect with Desktop SSO and Password Hash Sync.
Win7DJwithWPJ Windows 7 SP1
  1. Azure AD Joined Only
  2. Azure AD Connect “Desktop SSO” is enabled
  3. “enterpriseregistration” DNS CNAME exists
  4. Workplace Join v2.1 client installed
SUCCESS I was starting to lose hope after all these failed tests, but we now have a successful test!

The common denominator for the successful test was the DeviceTrustLevel changed to “Managed”

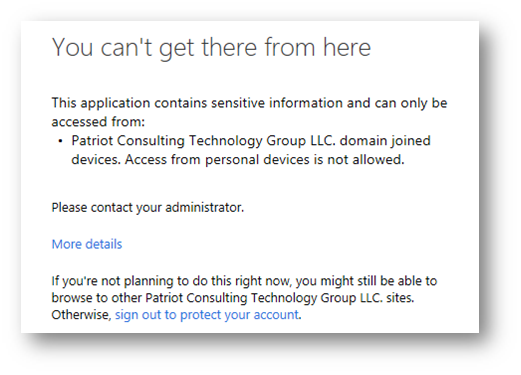
Block Page Example

This is the end-user example of what it looks like when you try to open an application protected by a Conditional Access Policy that requires Domain Join.

DNS Records

According to the documentation, is necessary to register the following DNS CNAME record in both internal and external DNS (if using split-zone / split-brain DNS):

DNS Entry Type DNS Value (Address)
enterpriseregistration.contoso.com CNAME enterpriseregistration.windows.net

Workplace Join v2.1

For Windows 7 and Windows 8.1 devices, the documentation states that it is necessary to deploy the Workplace Join client (MSI Package) from here. This is not required for Windows 10 systems, which can register to Azure AD via group policy, although in my lab that does not appear to be working, as that does not produce any records when I run get-msoldevice. Perhaps it requires ADFS for Windows 10 machines to work with Domain Join conditional access.

Workplace join Version 2.1 (Released June 2017) added support for Azure Active Directory Seamless Single Sign On (https://aka.ms/hybrid/sso).

Ready for some kludge? The installer creates a scheduled task on the system that runs in the user’s context. The task is triggered when the user signs in to Windows. The task silently registers the device with Azure AD with the user credentials after authenticating using Integrated Windows Authentication. To see the scheduled task, in the device, go to Microsoft > Workplace Join, and then go to the Task Scheduler library.

The two main benefits of this tool in my opinion is that it registers a Windows 7 machine in Azure AD, and, the version 2.1 client makes it so that you don’t have to use ADFS (simplifying the configuration).

Azure AD Seamless Single Sign-On

Azure Active Directory Seamless Single Sign-On (Azure AD Seamless SSO) is required for Windows 7 machines if you are not using ADFS. Instead, users will sign in and register to Azure Device Registration Services.

When enabled, users don’t need to type in their passwords to sign in to Azure AD, and usually, even type in their usernames. This feature provides your users easy access to your cloud-based applications without needing any additional on-premises components.

If you have ADFS, you do not need this feature as ADFS already provides “seamless SSO” (assuming you also deployed the ADFS STS web page to your Local Intranet zone in Internet Explorer).

*Note: The ‘Edge’ web browser is not yet supported. Currently IE, Chrome and Firefox are supported. Firefox requires custom configuration to make it work.

To deploy seamless SSO, you turn it on in Azure AD Connect, then you deploy it through Group Policy.

Azure AD Connect

You must be using version 1.1.484.0 or later of Azure AD Connect. Note: In the screen shot below, Pass-through auth is selected but ‘Password Synchronization’ could have been chosen as well.

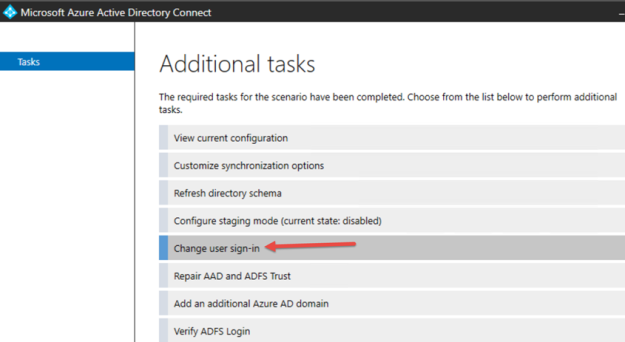
If you already have an installation of Azure AD Connect, choose “Change user sign-in page” on Azure AD Connect and click “Next”. Then check the “Enable single sign on” option

Completing that step will create a new computer object in Active Directory “AZUREADSSOACC” – if this object is accidentally deleted, users can still logon, but it will just be the standard logon just like prior to seamless SSO being enabled (so it ‘fails open’ so to speak). For more information see the technical deep dive here.

Group Policy

You can add the Azure AD device authentication end-point to the local Intranet zones to avoid certificate prompts when authenticating the device. This works for both IE and Chrome which both share the same setting. For other browsers see the references section.

To roll this out in a group policy object, here are the steps:

  1. Open the Group Policy Management tool on a domain controller, ex: start > run > gpmc.msc
  2. Edit the Group Policy that is applied to some or all your users.
  3. Navigate to User Configuration\Administrative Templates\Windows Components\Internet Explorer\Internet Control Panel\Security Page and select Site to Zone Assignment List

    Enable the policy, and enter the following values (1 indicates Intranet zone) in the dialog box.

    https://device.login.microsoftonline.com

    https://autologon.microsoftazuread-sso.com

    https://aadg.windows.net.nsatc.net

    Note: One of the references only listed the first URL, whereas another reference listed the bottom two. Since the documentation was not consistent, I’m including all three to be safe.

    Note: Rollout the above GPO at your own risk… It will add these and lock out/remove any other intranet site zones your users may have manually configured. My personal preference is to deploy these as group policy preferences instead.

    ADFS

    ADFS is not required as long as you deploy the Workplace Join v2.1 client to your Windows 7 systems, and you deploy Azure AD Seamless SSO.
    Reference: https://docs.microsoft.com/en-us/azure/active-directory/connect/active-directory-aadconnect-sso-faq#i-want-to-register-non-windows-10-devices-with-azure-ad-without-using-ad-fs-can-i-use-seamless-sso-instead

    Azure AD Configuration

    By default, Azure AD enables users to register devices. So unless someone in your organization changed this setting, you should not have to change this. This is found in http://portal.azure.com then find Azure Active Directory > Users and groups > Device settings. The policy “Users may register their devices with Azure AD” must be set to “All” (which is the default setting).

    Windows 10

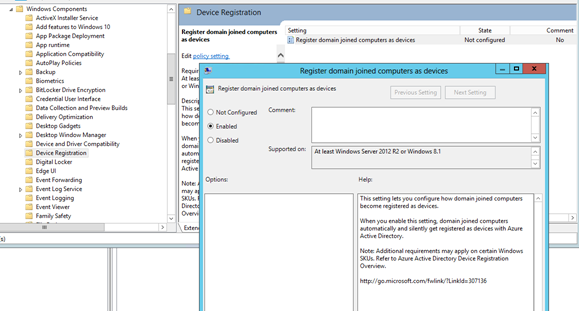
    All domain-joined devices running Windows 10 Anniversary Update and Windows Server 2016 automatically register with Azure AD at device restart or user sign-in. However, Windows 10 November 2015 Update automatically registers with Azure AD only if the rollout Group Policy object is set. So the best thing to do is configure a Group Policy object to control the rollout of automatic registration of Windows 10 and Windows Server 2016 domain-joined computers.

    Go to Computer Configuration > Policies > Administrative Templates > Windows Components > Device Registration. Right-click Register domain-joined computers as devices, and then select Edit. Select Enabled, and then select Apply.

  • Older GPMC Consoles may see: Computer Configuration > Policies > Administrative Templates > Windows Components > Workplace Join > Automatically workplace join client computers. Select Enabled, and then select Apply.


Testing

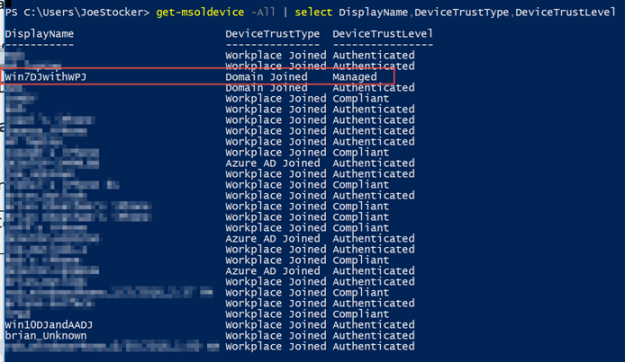
You can check successful registered devices in your organization by using the Get-MsolDevice cmdlet in the Azure Active Directory PowerShell module.+

The output of this cmdlet shows devices registered in Azure AD. To get all devices, use the -All parameter, and then filter them using the deviceTrustType property. Domain joined devices have a value of Domain Joined. In my testing, the only combination that seemed to work with conditional access is when the DeviceTrustType was Domain Joined, and the DeviceTrustLevel was Managed.


To test the scenario where the user enters only the username, but not the password:

Troubleshooting

  1. Check to make sure the computer account is syncing to the cloud by running get-msoldevice. If it does not show up there, then make sure the OU or container containing the computer objects is being synced. If it shows up there, it must have DeviceTrustType = ‘Domain Joined’ and DeviceTrustLevel = ‘Managed’
  2. For Windows 10 only, Check to see if the computer object contains a value in the userCertificate attribute. If not, this means that the computer is unable to read the value of the SCP object in Active Directory. Check to make sure that the Authenticated Users group is not missing from the “Device Registration Configuration” object.  To see if it can query the SCP, run this command:
    $config = [ADSI] “LDAP://CN=Device Registration Configuration,CN=Services,CN=Configuration,DC=YourDomain,DC=com”;$config
  3. On Windows 10, Run the dsregcmd /status and make sure ‘AzureAdJoined’ is Yes and ‘IsUserAzureAD’ is Yes
    Under User State, verify that WamDefaultSet is Yes, WamDefaultAuthority is organizations, WamDefaultId is https://login.microsoft.com, AzureAdPrt is Yes, and WamDefaultGUID contains a value.
  4. For Windows 7 only, run autoWorkplaceJoin.exe /i to find out the current status of the device, this will also provide helpful error messages as well.
  5. Enable Debug and Analytic logs in Event Viewer. Click the View menu. Select Show Analytic and Debug Logs to make these logs visible. Enable logs under Applications and Services Logs > Microsoft > Windows > User Device Registration, and then export the logs for Admin and Analytic folders about five minutes after you have rebooted (or signed-out/in)
  6. Check the troubleshooting article https://docs.microsoft.com/en-us/azure/active-directory/device-management-troubleshoot-hybrid-join-windows-current
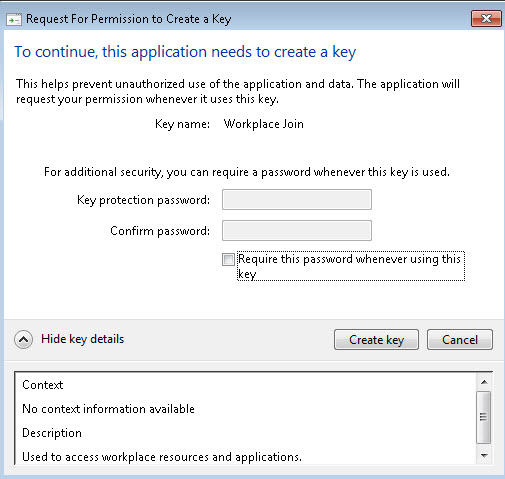
  7. When pushing out the Workplace Join Client, users may get a pop-up “To continue, this application needs to create a key.”

    To suppress this, you can push out a group policy object to not require user input for storing certificates.


Top 5 Azure Information Protection Limitations

Before I discuss the limitations of any product, I try my best to point out all of the things I appreciate about a product. In general, you will not hear Microsoft tell you about product limitations. I suspect it is a culture thing. But then again, do you expect a new car salesman to tell you about the limitations of the car they are trying to sell you?

So let me first point out that I have been a longtime fan of Microsoft’s Rights Management Services (RMS) which debuted in Windows Server 2003. As the product evolved over the years into what is now called Azure Information Protection, I became an even greater admirer of the product as well as the team within Microsoft responsible for its development.

A key milestone came when RMS was ported to Azure, because it became easy to enable (with one mouse click), eliminating the effort to configure servers on-premises, and especially the underlying Public Key Infrastructure (PKI) environment that RMS required.

With the rise in popularity of Office 365 (100 Million subscribers), many began to take advantage of RMS because it is included for free in the most popular business subscription (known as the “E3” license).

One of my favorite RMS features came in September of 2015, when Microsoft announced Document Tracking and Revocation capabilities (here). I’m still amazed by how cool this feature is, allowing you to see a map of the world and the location of where your documents have been opened!

Another key milestone in the evolution of RMS came when they acquired Secure Islands (announced by Takeshi Numoto on 11/9/2015). Six months later, Dan Plastina (@TheRMSGuy) first announced on 6/22/16 (here) that RMS would be rebranded as “Azure Information Protection” (AIP) and later reached general availability in October 2016 (here).

AIP is a truly jaw-dropping experience. As you are authoring content, the document will automatically be labeled and encrypted with a strong 2048 bit encryption key on-the-fly if sensitive information is found (ex: credit card numbers, social security numbers, or data you define as sensitive using regular expressions).

As a consultant, my job is to listen to customer problems, and then recommend solutions. This leads me to the title of this post – AIP Limitations.

Azure Information Protection Limitations

1. External Sharing using AIP with business partners who are still running Office 2010 (or older) needs improvement

When you protect a document with AIP, and you want to send that document to an external user, things go smoothly if they are running Office 2013 or Office 2016.

However, a lot of companies still run Office 2010. This is what their experience would look like:

“Dear External User,

We would like to share sensitive documents with you. If you are running Office 2013 or 2016, and if you have an Office 365 subscription, then you should be able to open the attachments without a problem.

Otherwise, if you are using Office 2010, you will need the following before you can open the documents we send you:

      1. Local Administrator Rights are required to install the Azure Information Protection Client
      2. Download and install the Azure Information Protection Client
        1. If you are running Windows 7, you first need to install KB 2533623 (This will require a reboot)
        2. Note: Office 2010 require Microsoft Online Services Sign-in Assistant version 7.250.4303.0. This version is included with the AIP client installation, however, if you have a later version of the Sign-in Assistant, uninstall it before you install the Azure Information Protection client.
        3. Note: The AIP Client will automatically install the .NET 4.6.2 Framework, so be sure not to deploy this on any machine that has known compatibility issues with the 4.6.2 framework.
      3. Be advised, that in some cases, even if you follow all of the steps above, you may still get an error message when attempting to open an RMS or AIP protected document in Office 2010. The work-around is to create a few registry entries for the service location as documented in the AIP Client Admin guide (here).

If you do not have an Office 365 Subscription, you will need to sign up for “RMS for Individuals” (this is a free identity platform that allows you to open the documents we send to you).”

2. Ad/Hoc External Sharing using an AIP Label is not possible

Let’s say you get a call from a new customer or business partner who wants you to send them a Microsoft Word document. The document is too large to email so you host it in online storage (ex: OneDrive, SharePoint, Dropbox, etc). You might be tempted to click an AIP label that says “Business Partner” or “Client Confidential” but that would not work in the current implementation of AIP, because the Labels must be associated with an RMS Template, and RMS Templates must be associated with Mail Enabled Security Groups, and those Groups must contain a Contact Object. Since normal end-users cannot create contact objects in their Active Directory or Azure Active Directory, they must submit a helpdesk ticket for the external contact to be created, then added to the appropriate Mail Enabled Security Group. You get the picture that this process just broke down fast. Essentially, there is no way with AIP today to associate a label with ad/hoc external sharing. Labels can only be used for defined and known business partners who are pre-configured as contact objects in a group associated with an RMS template that is then tied to a Label. It would be just as exhausting to implement this in a process as it was to type this all out I am sure!

3. There is no Mac OSX client for Azure Information Protection.
The work-around, as best as I can tell, is to have Mac users try the legacy “RMS Sharing App” for Mac OSX. This was the application written before the AIP client was released.

4.In April of 2016, there was a vulnerability discovered in the RMS technology that allows someone with View rights to escalate their privilege and change the document by stripping RMS from the document (which could be potentially undesirable if they then re-share that document with unauthorized parties, or if that document is exposed in the wild (ex: lost/stolen laptop, ransomware, etc). This is documented on Wikipedia here, and proof of concept code is available for testing from GitHub (here). This issue isn’t too great in my opinion, because it requires that one of the named users who is authorized to view the document has to compromise the document. In other words, an unauthorized party cannot break the 2048 bit encryption.

5.OneDrive.
Protecting documents with AIP or RMS automatically when they are uploaded to OneDrive is currently not a great idea. First, Microsoft has removed the navigation button permitting you to do this, so you would have to find the direct hyperlink to the document library settings to enable IRM on your OneDrive document library. Even if you were to do this, it would prevent you from sharing any of those documents with outside users because there is no straight-forward way to make a OneDrive library’s IRM settings understand external users. It essentially ends the ad/hoc sharing capabilities of OneDrive. Perhaps that is why MSFT removed the navigation button for site settings in OneDrive.

Guidance

So given these limitations, what do I recommend?

  • I recommend you use AIP to protect sensitive information that should be accessible to internal employees, or known/named individuals from business partners. When communicating with the business partner for the first time, try to find out if they use Office 2010, and if so, warn them that it will be a rocky road for them (see sample email template above). Fortunately, Office 2013 and 2016 seem to natively open AIP encrypted documents.
  • If you need to share documents with encryption in transit, then use Office 365 Message Encryption (OME). The limitation of OME (today) is that the recipient can save the document and do anything they want to it (the encryption does not follow the attachments after the recipient saves it to their computer). This will be resolved with the upcoming Secure Email feature that was announced at the 2016 Ignite conference.
  • If you need to securely share emails and documents with Gmail users, then wait for the upcoming Secure Email solution that was announced at the 2016 Microsoft ignite conference (watch the video here, starting around the 46 minute mark).

Roadmap

Will things get better? In many cases, yes, however, not for the external user who needs to edit the AIP/RMS protected document using Office 2010.
The proposed Secure Email solution will make it seemless for any user to VIEW AIP/RMS protected documents by providing a web-browser experience. But if the business process requires the external user to make changes and send those back, my understanding is that capability is not going to be in Secure Email when it is released (from what I have heard anyway). To be clear, if the external user is given edit rights, and if they are still on Office 2010, they are going to have the same pain points as I described above with Office 2010.

AIP Licensing

AIP can be licensed in one of four methods:

  1. You can get AIP as a standalone license for $2/user/month.
  2. You can get AIP as part of the Azure Active Directory Premium P1 or P2 license families.
  3. You can get AIP in the Enterprise Mobility + Security E3 or E5 license families.
  4. Or you can get AIP as part of the Secure Productive Enterprise E3 or E5 license families.

If you just need the original RMS capabilities (encryption, access control and policy enforcement) then you can license that individually or as part of the Office 365 E3 license.

If you need the Document Tracking and Revocation Capabilities, you’ll find that in the Enterprise Mobility + Security E3 or Secure Productive Enterprise E3.

Note: AIP automatic labeling is an advanced feature that requires the AADP P2, or EMS E5, or SPE E5 license. Otherwise, the down-level version of AIP requires the user to manually label documents they create.
Extension Dialing (aka) Tenant Dial Plans in Skype for Business Online

Microsoft has announced that “Tenant Dial plans” are now in Public Preview in Office 365 Cloud PBX. This is relevant for companies that migrate to Office 365 Cloud PBX (Skype for Business Online) and come from legacy PBX environments that include dial plans, such as a “4-digit” or “5-digit” dial-plan. For example, dial 1234 for Jim in California, or 51234 for Juan in Mexico.

Another scenario where this is useful is when users want to dial a shorter number for outside calls. For example, in the United States, you may want to dial a 7 digit number instead of the full 10 digits including your area code. Tenant Dial Plans allow you to do this.

For example, you can create a rule that looks for 7 digits ‘^(\d{7})$’ and prepends the E.164 prefix, along with the country code and area code: ‘+1425$1’

So that if 5551234 is dialed by the end-user, the actual number sent out would be +14255551234.

TIP: A normalization rule like this would be considered a ‘tenant-user’ plan because it would need to be applied on a per-user basis, since you can’t assume that all users in that country dialing 7 digits will always want a Seattle area code.

Sign-up for Tenant Dial Plans at Skype Preview  http://skypepreview.com

To learn more, watch the Skype Academy training video (26 minutes) here:

https://www.youtube.com/watch?v=sA4p77Shmns&index=1&list=PLH5ElbTc1hWTsunfXvNVnDFCJCCzrL3R9

Lessons Learned from watching the video above:

  • Only supported for Soft clients because the firmware running on existing handsets were designed when this feature was not supported
  • Administrative interface is powershell, but a GUI was promised “in a few months” according to the Skype Academy training
  • The application of Tenant Dial plans are different than how they are deployed in an on-premises Skype deployment. For example, in the on-premises deployment, dial plans are applied based on the most specific one first, ex: User, then Pool, then Site, then Global. If a user dial plan is assigned, then all other dial plans are ignored. In the case of these new Cloud PBX Tenant dial plans, the “Service Country” dial plan is always applied, and it is merged together with one of two options: a tenant-user dial plan OR a tenant-global dial plan.
  • Before you can use tenant dial plans in your Cloud PBX tenant, you must first configure hybrid users to consume the tenant dial plan, for example:
    set-cstenanthybridconfiguration -useonpremdialplan $false

How to restrict Office 365 Groups Creation to IT Department Only

Currently, an Office 365 Group can be created in OWA, the Outlook 2016 Client, Office 365 Planner, SharePoint, Microsoft Teams and PowerBI.

You may want to restrict Office 365 Group Creation to a group of authorized users (example: the IT Department): for testing, preparing support desk & training materials, etc. Then when ready, you can add additional authorized users to this group. Decide if you will use an existing Office 365 Group or Distribution Group, or create a new group, ex: “O365GroupCreators.” The catch is that the group cannot have other groups in it, group members must be users directly added.

Note: Users with higher tenant roles will always have the ability to create O365 Groups (ex: Global Admins).

Instructions:

Uninstall preview versions of Azure Active Directory Powershell

Download and install Azure Active Directory Powershell v1.1.130.0 Preview from Connect:

http://connect.microsoft.com/site1164/Downloads/DownloadDetails.aspx?DownloadID=59185

Launch Azure Active Directory Powershell, then run these commands:

  1. Connect-MSOLService
  2. Set-MsolCompanySettings – UsersPermissionToCreateGroupsEnabled $True
    ^^If this is set to $false, then the settings below will not take effect.
  3. $template = Get-MsolAllSettingTemplate | where-object {$_.displayname -eq “Group.Unified”}
  4. $setting = $template.CreateSettingsObject()
  5. New-MsolSettings –SettingsObject $setting
  6. $group = Get-MsolGroup -All | Where-Object {$_.DisplayName -eq “ENTER GROUP DISPLAY NAME HERE”}
  7. $settings = Get-MsolAllSettings | where-object {$_.displayname -eq “Group.Unified”}
  8. $singlesettings = Get-MsolSettings -SettingId $settings.ObjectId
  9. $value = $singlesettings.GetSettingsValue()
  10. $value[“EnableGroupCreation”] = “false”
  11. $value[“GroupCreationAllowedGroupId”] = $group.ObjectId
  12. Set-MsolSettings -SettingId $settings.ObjectId -SettingsValue $value

References:

https://support.office.com/en-us/article/Manage-Office-365-Group-Creation-4c46c8cb-17d0-44b5-9776-005fced8e618?ui=en-US&rs=en-US&ad=US

http://drewmadelung.com/managing-office-365-group-creation-via-azure-ad/

Sample Office 365 Group Syntax:

https://github.com/dmadelung/O365GroupsScripts/blob/master/DrewsO365GroupsScripts.ps1

OneDrive Admin Center First Look

[Post Updated 12/19 to correct the statement on Device Access with MAM settings]

At the Ignite conference, Microsoft announced (Here) that a new OneDrive Admin Center was coming before the end of 2016. It’s here now!


Accessing the new Admin Center is available via the hyperlink below for Office 365 tenants configured for ‘First Release.’ It is currently in preview ‘aka Beta’ and will eventually get added into the Admin menu. Until then, you need to access it via direct URL:

https://admin.onedrive.com


Here are my first impressions of the new admin center.

  • Better visibility into some settings that were previously only available through PowerShell


  • Some new MDM capabilities that previously required an Intune license


  • Nicely summarized Compliance Page with links for Auditing, DLP, Retention, eDiscovery, and Alerting. (No new capabilities, but it’s informative, educational and convenient to have them all listed for OneDrive Admin)


  • Several new settings are available in the OneDrive Admin Center that were previously not exposed in the SharePoint Admin Center:
    • Default Storage (ability to increase from 1TB to 5TB) (was previously only available in PowerShell)
      • Days to retain files in OneDrive after a user account is marked for deletion (was previously only available in PowerShell)
      • NEW Features: Device Access
        • Control access based on network location (this was briefly available in the SharePoint Admin center but was subsequently removed, but still configurable in PowerShell).
        • Control access from apps that can’t enforce device-based restrictions
        • Mobile Application Management (Requires Intune License, as this uses the Intune API to change the Intune MAM settings).

      • Allowing syncing only on PC’s joined to specific domains (was previously only available in PowerShell) here is a TechNet article on how to enumerate domain guids.
        • Block sync on Mac OSX (was previously only available in PowerShell)
      • Block syncing of specific file types (was previously only available in PowerShell)
  • Eleven OneDrive settings are not yet available in the OneDrive Admin Center (use the SharePoint Admin Center to manage these OneDrive settings)
    • External users must accept sharing invites using the same account that the invites were sent to
    • custom link expiration dates
    • Configuring the OneDrive experience (New or Classic)
    • Controlling whether all users or only specific users will get OneDrive sites created when a SharePoint license is assigned
    • Notifications (external sharing, or mobile push)
    • Show/Hide OneDrive Button
    • Script Setting that controls whether or not the ‘Copy to SharePoint’ button will appear in OneDrive
    • Ability to enable/disable IRM for OneDrive Globally
    • Ability to enable/disable IRM for individual OneDrive Sites
    • My Site Cleanup Access Delegation
    • My Site Cleanup Secondary Owner
    • My Site Secondary Admin
  • The following OneDrive settings are still only available in PowerShell and have not yet been surfaced in the SharePoint or OneDrive web admin interfaces:
    • Get-SPOTenant | ft ProvisionSharedWithEveryoneFolder
    • Get-SPOTenant | ft ShowEveryoneExceptExternalUsersClaim
    • Get-SPOTenant | ft ShowEveryoneClaim
    • Get-SPOTenant | ft ShowAllUsersClaim
    • Get-SPOTenantSyncClientRestriction | ft OptOutOfGrooveBlock
    • Get-SPOTenantSyncClientRestriction | ft OptOutOfGrooveSoftBlock
    • Get-SPOExternalUser


Here is a side-by-side comparison with the settings available in the existing SharePoint Admin Center (that apply to OneDrive)

Setting SharePoint Admin Center OneDrive Admin Center
Sharing outside your organization Same Capabilities
Anonymous Links Expiration Setting Unable to specify custom expiration date
Default Link Type Same Capabilities
Limit External sharing using domains Checkbox Same Capabilities
Prevent external users from sharing files they don’t own Checkbox Same Capabilities
External users must accept sharing invites using the same account that the invites were sent to Checkbox [Not Available]
Notifications [Not Available]
Show or Hide Options [Not Available]
OneDrive for Business experience [Not Available]
OneDrive Sync Button Same
Mobile Push Notifications – OneDrive for Business [Not Available]
Custom Scripts (determines whether or not the ‘Copy to SharePoint’ feature will be available in OneDrive) [Not Available]
Enable/Disable IRM for OneDrive [Not Available]
My Site Cleanup Access Delegation [Not Available]
My Site Cleanup Secondary Owner [Not Available]
My Site Secondary Admin [Not Available]
Controlling whether all users or only specific users will get OneDrive sites created when a SharePoint license is assigned [Not Available]
Delegating access to a OneDrive Site SharePoint Admin Center > User Profiles > User Profiles > Find the profile

Right Click > Manage site collection owners

This is not available in the OneDrive Admin Center, however, it was recently added to the main ‘Active Users’ options

Why PSTN Conferencing Dynamic Conference IDs are so important

Microsoft announced on Friday, August 12th that Dynamic Conference IDs are coming September 1st to Office 365 E5 PSTN Conferencing.

This is an important because it solves a privacy limitation with the current static conference ID’s in service today.

Without dynamic conference IDs, there are no great options to prevent new external callers from interrupting an in-progress meeting (that may be running long). The default ‘out of box’ configuration allows unauthenticated external callers to be admitted into the conference. The option to override this behavior is to change the policy ‘these people don’t have to wait in the lobby’ to “Only me, the meeting organizer.”

However, when that option is selected, the meeting organizer does not receive any pop-up notification to admit PSTN callers who are waiting in the lobby (they just sit there forever). This particular scenario is not directly mentioned in the “Dial-in conferencing known issues” support article. And that is why Dynamic conference IDs will be such a great thing starting September 1st! Note: Any previously scheduled meeting will not automatically have this option, only new scheduled meetings going forward after 9/1 will have this option. Also, any recurring meetings will need to be rescheduled with a new dynamic conference ID to benefit from this privacy feature.

The most useful and controversial changes in Office 365 (Part 2 of 2)

This is part 2. To read part 1, click (here).

In general, Corporate IT Departments want to control the end-user computing experience. Surprises are to be avoided. Pop-ups are anathema to Corporate IT because they result in annoying helpdesk tickets “should I click on this button?” (anyone who has ever served on a helpdesk, God bless them, is rolling their eyes because they know that non-technical people somehow cannot deal with pop-up messages. My favorite: “Should I accept this end-user agreement?” My sarcastic response: “Just click no, we can end this call now and close the ticket.” In all seriousness, surprise pop-up messages that are not communicated first by a trusted source, (“The IT Department”) can cause non-technical end-users to freeze up and panic. Therefore, changes in Office 365 that disrupt the end-user in any way (pop-up messages, etc) are seen as highly controversial (to put it mildly).

Here is a summary of the most controversial changes in Office 365 over the past six months.

The What’s new dialog prompt:

Why is this controversial? First, because this pop-up cannot be suppressed. The ‘What’s New’ dialog box will appear approximately once every 30 days to communicate changes directly to end-users. If the IT Department doesn’t proactively notify end-users about the contents of the pop-up, then this could lead to questions by end-users on whether it is a virus pop-up; many users have been conditioned (wisely) to not click on unfamiliar pop-ups.
Second, because it can advertise features that that IT Department may have disabled, leading to confusion among end-users. For example, if IT has disabled ‘Office 365 Groups’ then do you want a pop-up message to advertise features about it?

The “One-Click Archive” button in Outlook, announced on Feb 25th (here).

Why is this controversial? First, because it generates a pop-up message in Outlook that causes a non-technical person to have to make a decision.

This can lead to helpdesk requests from users seeking advice on what to decide (anyone who disputes this has never worked on a helpdesk before).

Second, because IT has no administrative controls to disable this feature. Why would someone want to disable this? Because if an Enterprise has enabled the Personal Archive feature then this button does not integrate with it, and instead creates a 2nd location to store archived messages. This leads to confusion by the end user on where to look for messages.

OneDrive for iOS App – take data offline -announced May 4th (here)

The OneDrive iOS can now take OneDrive and SharePoint files offline.

Why is this controversial? If you don’t have a Mobile Device Management (MDM) solution such as Intune deployed, how will you wipe the offline files when the employee leaves your organization?

Docs.com – announced August 4th

Docs.com
provides a way for users to Publish Office Documents externally, directly within Word/Excel/PowerPoint, or by browsing to docs.com.

Why is this controversial? If your organization has limited external sharing (for security reasons) then Docs.com allows your users to bypass controls setup by IT/Security. IT Departments who have configured URL filtering to block Google Drive, DropBox and other 3rd party file sharing sites may elect to block Docs.com, since Microsoft currently does not provide any IT controls to disable this feature. For more information click (here).

Second, because your users will be receiving a pop-up notification to advertise this feature. So even if you block docs.com via a URL filter, you cannot suppress the what’s new dialog box.

Clutter is replaced with “Focused Inbox” – announced July 26th (here)

Focused Inbox is essentially a way to quickly filter an inbox to show the most important items, similar to what Clutter promised, but with the advantage of not moving it to a separate folder. This is the same feature that has already been available to the Outlook for iOS (if you are using it).

Why is this controversial? Users will receive a pop-up prompt in Outlook to opt-in to Focused Inbox. After they opt-in, Clutter will no longer move items to the clutter folder. Read this help article for more details on the prompts users will see and how to turn Focused Inbox on and off.

IMHO – Focused Inbox is really a much better way to solve the same problem of decluttering an inbox by simply providing a user a ‘view’ of their inbox. IT should communicate the value of Focused Inbox rather than resisting it or scrambling to disable it. Office 365 admins will have mailbox and tenant level control of the feature to stage the rollout in a manner that works best for their organization. However, I feel this is a good feature that should be left on when it rolls out to first-release subscribers in September.

Honorable Mentions:

Modern UI in SharePoint/OneDrive. Did I miss any controversial changes in the past 6 months? If so, please leave a comment.

Have you been caught off-guard by changes in Office 365? Patriot Consulting offers a monthly subscription service to help IT Departments understand and prepare for upcoming changes in Office 365. Watch a brief video about our service (here) or drop us a note at [email protected] to learn more.

The most useful and controversial changes in Office 365 (Part 1 of 2)

This is the first of a 2-part blog series highlighting the changes in Office 365 in the last 6 months (April 2016 to present).

When it comes to human attitudes toward change, I have found there are three types of people:

  • Those who embrace change
  • Those who resist change
  • Those who are indifferent towards change

This blog post (part 1 of 2) should satisfy those who embrace change, while my second post should intrigue those who resist change. Wait, why not a 3rd post for those who are indifferent towards change? People who are indifferent towards change are probably not reading this blog, as they would have read the title and sighed ‘meh’ before continuing on with their day.

  1. March 18th: Common Attachment Types Filtering for Exchange Online Protection (EOP)

    There is a new configuration setting in EOP feature that provides an easy-to-setup method of filtering out unwanted and potentially malicious attachments by their file types. This feature requires a single click to enable, and can be configured from a list of the file types commonly found to be dangerous. For more information click (here).

  2. April 19th: Office Deployment Tool allows Visio and Project (MSI) to be deployed

    alongside Click-to-Run versions

    This enables IT to deploy the the MSI versions of Visio and Project side-by-side with Office 365 ProPlus click-to-run, as long as they are deployed using the Office Deployment Tool. For more information click (here).

  3. April 14th: OneDrive for Business Next Generation Sync Client (NGSC)

  • The NGSC is 4x faster than the old engine (groove.exe)
  • Includes the highly anticipated ‘Selective Sync’ where users can leave some content in the Cloud and only sync the folders they want
  • Large file limit increased from 2GB to 10GB
  • The sync engine now supports the ‘takeover’ feature, which eliminates the need to re-download all OneDrive content after the NGSC is installed
  • Note: The last feature we are still waiting for is the ability for the NGSC to sync SharePoint document libraries and Office 365 Groups. Until then, Groove.exe must run side-by-side with the NGSC OneDrive.exe

Honorable Mentions:

Flow, Planner, Gigjam, ASM, Bookings, & “Toll Free Numbers in Cloud PBX PSTN Conferencing”